Author: Duke

  • What is Scrum? 101 Guide For New Developers

    What is Scrum? 101 Guide For New Developers

    When I got my first job as a web developer, I was over the moon! Part of my everyday work was to join various meetings. In many of them, I heard unfamiliar terms about scrum repeatedly without recognizing them. Inevitably, this sparked my curiosity, leading me to research what is scrum and its associated jargon.

    Don’t get me wrong, I could, of course, ask, I could, and I did, when I didn’t feel shy to do so (yeah, I am that kind of person… 🤷‍♂‍).

    After learning these terms, though, I wanted to share them with you. They might help you by preparing you for interviews, for your first meetings, or if you are feeling a bit shy (though you really shouldn’t be). After all, as one of my professors used to say:

    There’s no such thing as a stupid question! Only stupid answers!

    Heads up! This post is meant to be a simplistic approach to Scrum, think about it as a friendly and practical introduction to some of Scrum’s concepts. My basic goal here is to help you become more prepared by having all the information you need when working with these concepts.

    Ok, you’ve been warned, let’s start our exploration…

    Scrum terminology

    Scrum is a framework, a set of “rules” and tools, used for managing projects. It has nothing to do with the way you write code and implement features. Companies use it for managing software development phases but it may also apply to other types of projects.

    Scrum has a set of meetings, principles, and tools that were created to help teams achieve their goals faster and more efficiently.

    Let’s check some terminology about Scrum’s tools:
    (I dislike terminologies too! It’s just that we need to define a few words so that we can both be on the same page…)

    Sprint

    A sprint is a pre-determined period of 2–4 weeks (duration is agreed upon by the team), during which the team decides to achieve specific objectives. In a team of developers, these objectives would consist of implementing some features.

    Backlog

    A list of tasks and features that the team needs to evaluate, prioritize, and add in a sprint. You could think about it as a to-do list.

    Roadmap

    A roadmap is a plan that includes all high-level goals and milestones for a product. Picture it as a combination of the desired features the team intends to implement along with a carefully crafted timeline. By looking at a roadmap, one should have a clear overview of the path that was defined by the product team regarding the product’s vision.

    Daily Scrum (a.k.a Standup)

    A meeting that is held on a daily basis, in which each developer answers the following questions:

    • What did you do yesterday?
    • What will you be working on today?
    • Is there anything blocking your work?

    Why is it called a standup? Usually, when this meeting takes place, the team creates a circle in which every member is standing. The reason behind standing up is to finish quickly your daily report and not spend more time than needed.

    Now that we know a bit more about Scrum let’s see what is a Sprint planning meeting and how we play Scrum poker.

    Sprint planning

    Before the start of a sprint, the development team and members of the product team will hold a meeting called the Sprint Planning meeting or simply Planning.

    The goal of this meeting is to decide, usually based on priorities, which features will be implemented by the team in the upcoming sprint.

    Group of people discussing in front of a kanban board
    Photo by Austin Distel on Unsplash

    Although guidelines on what you would discuss during such meetings vary from team to team, some common discussion topics are:

    • Which tasks from the backlog should you, as a team, implement in the new sprint?
    • Define the team’s capacity. By capacity, we mean how much work each team member can achieve during the next sprint
    • Review any new feature specifications and acceptance criteria
    • Define potential bottlenecks
    • Assign tasks/features to a developer based on their capacity

    Each planning is unique and may vary from team to team. So take what I describe here with a grain of salt.

    Acceptance criteria is a list of characteristics a feature should have to be considered successfully implemented.

    Bottleneck is a term used when we refer to an issue that is blocking other processes.

    Scrum poker

    During your sprint planning, and before the product manager decides to finalize it by starting the new sprint, you could hear your team members asking for poker time!

    Poker scene of Casino Royal movie
    Casino Royale

    Yeah not that kind of poker, although a good poker face is always an asset! To play Scrum poker, first of all, you will need a special deck of cards, one example is seen in the image below:

    A scrum poker deck of cards
    Source: Wikipedia — Planning poker

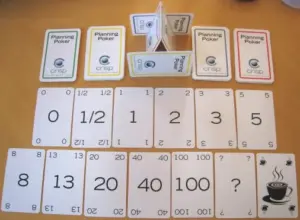
    Each card has a score, which represents the difficulty of the implementation of a feature. The larger the number, the greater the difficulty.

    Playing poker isn’t hard at all… Scrum poker I mean. How is it played you ask? Let’s have a quick glimpse:

    Preparation

    Every team member gets their own cards or uses scrum poker mobile apps, instead of cards, if they fancy electronic cards. They all sit together or open cameras if the team is remote.

    Playing poker

    One member of your team selects a feature from the ones you have decided to add in the new sprint.

    Every member evaluates the feature by deciding on its implementation difficulty and selecting the respective card. This process is done without members sharing their thoughts or showing the card to each other. Not yet at least.

    One member (usually from inside the team) starts a countdown, of a few seconds.

    When the countdown ends all members show each other the scoring card they‘ve selected, for the sprint item, under evaluation.

    If all scores are the same (yeap it can happen) this score gets assigned to the sprint item. If there are significant differences between cards, then, whoever has a card that deviates from the team’s average shares their thoughts on the reason for their selection.

    E.g if the average amount of cards shown is 13 and one member has selected a card with the number 40, it would be nice to explain the reason. This way the team might find out if something got ignored by mistake about the item’s implementation, from the other members of the team. If the team still feels they need to stay at 13 then the score is assigned to the card, otherwise, they change it to a new one.

    Since the evaluation of the feature has finished, The next sprint item is selected and the loop starts again. This process is repeated until all sprint items have poker scores.

    Why do we play poker?

    Ok, we played poker, but why? What does this score represent for each card? This score is just a difficulty level, it means something is more difficult compared to something else. It has nothing to do with how many hours, or days it will take for a feature to be deployed.

    But why do we care to score, based on how difficult something is?

    Let’s say you have a team that has worked for 10 sprints, and in each sprint, the team has developed, features of, on average, 65 points. By knowing this, a product manager will be able to identify how much their team can deliver and how fast that could happen.

    Now, wait a minute there… I used the “how much” word, right? And we said that score has nothing to do with time…
    Well yeah, but in the end, it’s a metric, which will inevitably get used by the product team when a roadmap is created. It will be used to answer how soon some features may be deployed and when some goals from the product team could be reached.

    I believe now you are ready to play some poker when requested by your team! Just don’t forget your hat and sunglasses! 🤭

    Hint
    If you have just been onboarded on your team, it may be not easy to evaluate a feature, since you may know nothing about the codebase… It makes sense, and your team knows that, so don’t feel bad about it, give it your best guess and you’ll be just fine!

    Retros

    So your sprint has finished, you gave it your best and now it’s time for confession, the retro meeting!

    The first time I got in a retro meeting, my manager, told me “Would you like to start?” and I was like… “Sure… what should I say?” 😇

    Retros, or Sprint retrospectives, are the best meetings of the Scrum framework! At least from my point of view. A retro meeting is set at the end of a sprint and is a powerful tool that teams use to get information about the issues they faced during the sprint.

    During the retro, each team member reflects on what was good or bad during their sprint. As a guideline, usually, some of the questions you would see getting answered would be:

    • What went well during the sprint?
    • Was something problematic?
    • What could be improved in the next sprint?
    • What can the team do to better support each other?
    • How can the team improve its performance?

    I like it because it’s a great opportunity to share your thoughts/feelings and by doing so, bond with your team. It might feel difficult to do so at your first gatherings, but after a while, you’ll love it! I’m sure!

    It’s group therapy if you think about it 😇 and a great way to finish your sprint/week! Believe me, if you learn how to master this meeting, you will be able to help your team and also improve your workflow! Don’t be shy, you got this!

  • Beginner’s Guide to Environment Variables with Dotenv

    Beginner’s Guide to Environment Variables with Dotenv

    So you are ready to use your secret credentials for your awesome project but have no idea how to hide them from the world? You’re in the perfect place! Let’s dive into the steps you should follow to add environment variables to your project using dotenv.

    In this post, you will find solutions for Ruby on Rails and Javascript projects. Simply select the approach that best fits your tech stack.

    Why use environment variables?

    I am pretty sure you already know why environment variables are essential, but just to get it out of our way, let’s take a moment and dig a bit deeper. Why do we need to use environment variables? Is it because everyone else is using them? I am sure your gut feeling tells you that’s not the case. So, what’s the main reason?

    Security is the key to all your environment variable questions

    The first and most important answer to this question is Security. Imagine you have credentials for a database with sensitive user information, like financial data. Or perhaps you have an API key that you get charged for using, e.g an API for sending emails.

    To use these sensitive credentials in your codebase, you’ll eventually need to hardcode them. The problem with hardcoding is that whoever accesses your code, even accidentally, could gain access to these credentials. This could lead to a major security breach, especially if they start using them for personal gain, leaving you with the charges!

    How do we solve this? Dotenv to the rescue! 🦸‍♂️

    What is dotenv?

    Dotenv is a popular library that helps with managing variables in applications. It loads environment variables from an .env file to your development environment, making them accessible via the process.env for Javascript developers or through ENV for Rails developers.

    In Javascript, the library’s name is dotenv and, in Rails, its name is dotenv-rails.

    But what is an .env file? An .env file is a simple text file used to store environment variables for an application. It typically contains key:value pairs, like API_KEY=123456, and is used to keep sensitive information separate from the application code.

    Using dotenv allows our code to pull specific values from a secure, designated location instead of hardcoding them into the codebase. These values are loaded by dotenv from the .env file.

    dotenv is mainly for development, in production, platforms like Vercel, Netlify, Heroku, or AWS usually provide their own way of setting environment variables.

    Environment variables for Javascript

    As mentioned above, we will be using the dotenv library for our Javascript project.

    How to install dotenv?

    The first thing we need to do is install the dotenv package by typing:

    npm install dotenv
    Bash

    (In case you are wondering, we don’t need the--save flag to record dotenv in our package.json dependencies).

    The next thing we need to do is create our .env file by doing:

    touch .env
    Bash

    Make sure your .env file is included in your .gitignore so you don’t accidentally commit sensitive values to your repo.

    How to use dotenv?

    Great, so we have our empty .env file and dotenv installed. Let’s combine all the necessary pieces and make this work.

    In the .env file, add an API_KEY variable like this:

    .env
    API_KEY="my super secret key here"
    Ruby

    At this point, if you try to print the API_KEY you won’t see anything. Although we’ve defined the variable, we haven’t properly loaded dotenv yet.

    To load the dotenv library and make it populate all variables from our .env file, simply add the following line to your code:

    index.js
    require('dotenv').config();
    
    // or ES6 if you have "type": "module" enabled in your package.json
    import "dotenv/config";
    
    JavaScript

    Make sure to add this line at the very beginning of your code to load environment variables as early as possible.

    By loading dotenv, all variables from our .env file are added to process.env (in JavaScript) or ENV (in Rails).

    Environment variables for Rails

    For our Rails project, we’ll be using dotenv-rails to manage environment variables. Here’s how to set it up and use it effectively:

    How to install dotenv rails?

    In your Gemfile add the following line

    GemFile
      gem 'dotenv-rails'
    Ruby

    Remember, you need to activate this for your development and test environment, so if you have used the Rails generator, you will see the development/test group near the bottom of your Gemfile. That’s where you need to add your new dotenv-rails gem.

    GemFile
    
    group :development, :test do  
      gem 'dotenv-rails' # add this line
    end
    
    Ruby

    Otherwise, you could also add the following code:

    GemFile
    gem 'dotenv-rails', groups: [:development, :test]
    Ruby

    You need to create an .env file now in which you’ll be adding all your environment variables. In your terminal, type:

    touch .env
    Bash

    Let’s now proceed with installing the new gem that we added to our Gemfile:

    bundle install
    Bash

    How to use dotenv rails?

    Suppose we have the following env variable in our .env file

    .env
    MY_VARIABLE="cool-password-here"
    Ruby

    Depending on where you are, you might see the following ways to access your environment variable

    value = ENV["MY_VARIABLE"]
    Ruby

    or in a YAML file, e.g database.yml

    <%= ENV.fetch("MY_VARIABLE") %>
    Ruby

    Different .env files per environment

    In some cases, you will need to use different .env files per environment.

    Common setups are:

    • A single.env file for all environments
    • Separate .env files for each environment, such as .env.development, .env.test and .env.production.

    This approach may make it easier for you to manage environment-specific settings and needs.

    How to create an .env template file?

    Regardless of the names you’ve included in your .env files, sharing them with your team can pose challenges since you won’t be including the .env file in your repository, for security reasons.

    So, if you’re not sharing the .env file, how will your team – or anyone else working on the codebase – know which variable names to use?

    The solution is to create an .env template file that lists all your variable keys but NOT their values. Once you’ve set up your .env file and are ready to create a template, run the following command in your terminal:

    # where .env is an example of a file name, yours maybe different.
    
    dotenv -t .env
    Bash

    By doing so you will see a newly generated env file which will have the same keys as in the .env, but only placeholders as their respective values.

    So, suppose we have the following .env

    .env
    MY_DB_PASSWORD="my db password"
    MY_AUTH_PASSWORD="my auth password"
    Plaintext

    by executing the env template command, we’ll get the following .env.template file

    .env.template
    MY_DB_PASSWORD=MY_DB_PASSWORD
    MY_AUTH_PASSWORD=MY_AUTH_PASSWORD
    Plaintext

    The .env.template file can be shared with your team members with no fear. Afterward, you’ll just need to find a secure way to share the actual env values so they can replace the placeholders and use them instead.

    Unfortunately, templating doesn’t work for Node, so you will have to do it manually.

    Add .env files to .gitignore

    So far, we’ve discussed creating and using an .env file, but how can we prevent it from being accidentally committed to version control?

    To ignore our .env files, we need to add to our .gitignore file:

    .gitignore
    .env
    Plaintext

    This way, we are ignoring our .env file and not our .env-template (if we have generated one).

    In case we have more than one .env files, e.g .env.production and .env.test and we want to ignore these but not the template file we will have to change our previous entry to:

    .gitignore
    .env*
    !.env.template
    Plaintext

    Try testing this by running git status to ensure the .env file is indeed being ignored before committing your code. It’s always a good idea to double-check and validate your setup to avoid accidental commits.

    Make sure to add your sensitive files to .gitignore to prevent them from being committed! This simple step protects your sensitive data from accidental exposure.

    For more configuration settings, check the dotenv GitHub page.

    Frequently Asked Questions 🤔

    Should I use Vite’s dotenv or dotenv package?

    Vite is using dotenv to load environment variables from specific files like e.g .env, .env.local. Because of this you don’t need to install dotenv separately, you just need to create these files in your project and use them.

    I would suggest staying with Vite’s approach for simple projects. If you need more control and flexibility. then consider installing the dotenv package

    Which command prints partial or full environment variables?

    Let’s assume our variable’s key is API_KEY. To print its value, we have the following commands available:

    For Javascript

    In your codebase:

    // To print all environment variables, use:
    
    console.log(process.env);
    
    // Or to print a specific variable:
    
    console.log(process.env.API_KEY);
    
    JavaScript

    In your terminal:

    Environment variables from your project’s .env file are not loaded as a part of your shell’s environment. Your shell’s session keeps track of its own set of variables. So, if you try to do something like printenv API_KEY it won’t work unless you have explicitly exported your app’s .env file’s variables in your shell’s session.

    To be able to print your project’s variables while inside a shell, you need to load them first by doing:

    source .env
    Bash

    The source command will load your .env file variables directly in your shell’s session. By doing that, you now can type

    
    echo $API_KEY
    
    Bash

    and see the value of your variable. Remember, though, that this will be temporary and only for your current shell session. If you close your terminal and start another session, your variables will not be available unless you reload them.

    For Rails

    In your codebase:

    // To print all environment variables, use:
    
    puts ENV.inspect
    
    // Or to print a specific variable:
    
    puts ENV['API_KEY']

    For terminal use, it’s the same as Javascript.

  • How to Embed CodePen in a WordPress Blog

    In this post, we’ll learn how to embed Codepen projects in WordPress the right way. If you are here, chances are, you have tried to embed a project and got an error about a referer required by Codepen.

    Codepen information message: Do not enter passwords or personal information on this page

    I might also be right to assume that you did so by copy-pasting the project’s URL on your website while trying to do so.

    Let’s explore a different way to embed Codepen projects without getting this error. The first thing you need to do is visit the project you would like to embed. While on the project’s page check to the bottom right and find a button labelled “Embed”.

    Codepen screesnshot - Embed button located on bottom left on Codepen project
    Codepen project by Marilena

    Click on it and you will see a modal popping up with the following options:

    (We have added colored light blue numbers in the following image to help you out with each setting)

    1️⃣ Default tabs – Here, you have the option to choose which tab will be initially displayed as selected.

    2️⃣ Theme – Select if you would like to show your embedding in a light, dark, or custom theme.

    3️⃣ Click to load – By enabling this setting your embedding will not load by default, it will rather show a “Run Pen ⚙️” cta at the bottom of your embedding preview.

    4️⃣ Code Editable – Enable this setting if you would like to provide your viewers with the ability to edit the embedded pen in real time.

    5️⃣ Code snippet type – Each tab (HTML, WordPress, etc.) shows a different type of code snippet you need for your embedding. The type you need depends on your WordPress Editor so you’d better check the Embeds Codepen’s guide to be sure what to select.

    6️⃣ Copy code – Rather than manually selecting the code snippet, simply click this button to copy it. 😋

    Adjusting height

    There is a way to adjust the height of your embedding which is often easily overlooked. While on the embedding settings modal, hover over the bottom border on your preview screen, click on it, and adjust your height according to your needs.

    Codepen recorded gif showing how to adjust height of embeded preview while setting it up

    An alternative approach could involve directly modifying the value of the data-height attribute within your code snippet to your desired value.

    Finally, to embed your pen, go to your WordPress editor, type /shortcode, and press Enter.

    How to embed codepen in WordPress: Using WordPress shortcode to embed your codepen

    Paste the code snippet you copied from Codepen where it says: “Write shortcode here“.

    Saving your post and previewing your changes should look something like:

    See the Pen
    Avatar with Shine Effect
    by MarilenaKarp (@marilenakarp)
    on CodePen.

  • How to Improve Pull Requests: Prep & Split Strategies

    How to Improve Pull Requests: Prep & Split Strategies

    There will be times when you will be working on huge features (if you haven’t already 😎), some of which could take weeks and some even months. During your implementation, you will have to find a way to create better pull requests and try to write kickass code, all while figuring out how to make the review process better. After all, better reviews mean fewer bugs, right?

    In our previous post, we discussed some ideas for improving pull requests after a pull request has been created. However, sometimes, improving a pull request may require actions to be taken before our initial commit.

    So how can one create a better pull request before even committing their changes? The answer lies in carefully planning the steps of implementation before starting the actual implementation process. Whaaat? 🫨

    FX Networks series - Mind blown gif
    Source: Giphy

    Let’s decide on an example or a use case so that we can discuss our theory on common ground.

    A full-stack feature use case

    (This is a use case with simplified specs, used only as an example for this post, to ensure that we are both on the same page when discussing the topic at hand)

    To illustrate, let’s suppose we were asked to implement a new full-stack feature. In our example, we’ll assume that we want to add a new comments section to our blog.

    After having a design session with our team, the following specs were requested:

    Use case – Feature specs

    specs, short for specifications, outline the requirements a new feature implementation must meet to pass QA testing and be deployed.

    • In the existing post section, a new comments section will be added where readers can view and add comments related to the post.
    • Both the writer and the admin will be able to add, edit, and delete any type of comment.
    • A reader will also have the ability to add/edit/delete their own comments.
    • Show statistics for each post’s comments.

    Prerequisite changes

    It’s considered good practice to always take a step back and carefully consider the steps you should follow to implement a feature before diving headfirst. As the saying goes:

    Measure twice
    Cut once!

    But how does this relate to creating better pull requests?

    Well, in my opinion, when thinking about a feature’s implementation, the potential outcomes typically fall into the following categories:

    • Ways to achieve the desired outcome
    • Challenging code areas that may need refactoring beforehand
    • Necessary changes that are not directly related to the feature

    (This list is not that comprehensive! 😋)

    Both the last two items on the list are related to prerequisite changes that need to be made before the feature is successfully implemented. Some examples of these changes could be:

    • Introducing a new package dependency that needs to be used by your feature
    • Introducing some reusable components
    • Perform some code cleanup before introducing new code

    By identifying similar changes early on, you can significantly streamline your feature’s review process. Rather than creating one massive pull request that could make your colleagues’ lives challenging, you could create initial pull requests with independent changes, merge them, and continue with your feature implementation. In the follow

    Identifying our use case prerequisite changes

    While thinking about the feature’s implementation, I realized that it would be beneficial to introduce some distinct roles for our users, such as readers, writers, and admins. Additionally, since we have decided that we need statistics, I did some research and came across a fantastic statistics package to use for displaying how many comments a writer has over time.

    Although both changes are connected to our feature implementation, it’s worth considering the extent of their interdependence. Could we introduce these two changes and deploy them without completing our feature? The answer is yes! But how?

    These two changes, along with any necessary tests, could be included in different branches from which we would create pull requests and get them deployed.

    One branch will introduce user roles, and the other will contain the installation and configuration of the statistics package.

    These two branches can be referred to as prerequisite branches.

    Both pull requests will likely (depending on the codebase and implementation) not affect our existing codebase and can be reviewed and merged independently. As a result, we can continue working on our feature, without having our work blocked, at least not initially.

    Don’t get me wrong. Eventually, we will need our prerequisite changes. However, until that point, we will have found a way to continue our work and also start deploying pieces of code that do not impact our users or hinder our work.

    Splitting commits

    Now that we have reviewed and deployed our prerequisites, we need to focus on the actual feature. If you also like to work on full-stack features, you might find yourself following three paths while implementing a new change:

    • Starting from the backend.
    • Starting from the frontend.
    • Diving in both.

    Defining the best approach depends on your developer profile and the work needed. Each approach has many advantages but I’ve seen that shifting between approaches from time to time can transform and improve your mindset as a developer. So choose wisely and have fun!

    Meanwhile, if you decide to adopt the one-side-at-a-time approach then why not improve your pull request using the same method? How? By splitting your commits as you progress with your implementation.

    Splitting commits, for example, by backend and frontend ones, may also help if you are working with a team that doesn’t have full-stack engineers but separate teams of front and back-oriented developers.

    Splitting your work into smaller commits may also enhance your review process and lead to better pull requests. This is because individual commits also help reviewers concentrate on specific commit changes rather than the entire scope of your pull request.

    Applying split commits to our example

    To see that in action, let’s assume in our example that we will be following the implementation steps below:

    Backend implementation

    • Implement the comments CRUD logic.
    • Introduce role handlers needed for checking who can see what.
    • Add any unit/integration tests.

    Frontend implementation

    • Create our new UI views and any additional components.
    • Add the necessary routes.
    • Add any unit/integration tests.

    By creating two separate pull requests or one pull request with different commits, each containing the respective changes (backend & frontend), we can greatly improve the efficiency and effectiveness of the review process.

    I get it. Sometimes, this may seem like overkill, but trust me, breaking work into smaller pieces, will unlock new paths in your thinking process which will boost your problem-solving skills in multiple ways.

    In general, developers often neglect managing pull requests as we tend to believe that our work ends when pushing that final commit. I can assure you, though, that giving more emphasis on the other aspects of your workflow, as we’ve talked about in this post, can have a significant impact on your work.

  • What Is a Cron Job? Simple Guide for Beginners

    What Is a Cron Job? Simple Guide for Beginners

    I have been using crons for a while now, but I always wanted to spend some time reading about them or creating one from scratch so that I could fully understand what is a cron job. This post is exactly that: notes on creating my first cron job, learning what a cron is, and what I’ve discovered during the process. 

    What is cron, and how does it work?

    The name cron originates from the Greek word hronos (Greek χρόνος), which means time. Υou may also know the word as Chronos or Kronos, who was the god of time and king of the Titans in Greek mythology.

    A cron is a daemon, meaning it is a process — an instance of a program — that runs continuously in the background of a Unix-like operating system. It usually starts along with the system and stops when the system shuts down.

    We suffix daemon process names with the letter d to show that they refer to a daemon. That’s why you might see a cron also mentioned as crond, instead of just cron.

    A typical cron day

    If a cron runs continuously, what does it do while running?

    📆 A cron’s typical day would probably look something like this:

    For each minute of every day

    1. Check if you have anything to do now, this minute.
    2. If you have something to do, do it.
    3. Get back to sleep for one minute.
    4. Wake up and go back to step 1.

    Now we are getting somewhere, so it is a process that checks every minute if it has something to do, at that specific minute. But where does it live? Can we see it?

    Let’s open our terminal and type

    sudo systemctl status cron.service
    Bash

    ℹ️ systemctl command is a utility – a helper command – which helps us control the systemd, the system daemon. (ctl suffix stands for control)

    ℹ️ systemd – is a system daemon that is used to manage other daemons.

    So basically, what we are trying to do through this command is ask a manager daemon to show us the status of our cron service. Executing it shows the following information:

     cron.service - Regular background program processing daemon
         Loaded: loaded (/lib/systemd/system/cron.service; enabled; vendor preset: >
         Active: active (running) since Sat 2024-03-01 09:55:40 EEST; 3 days ago
           Docs: man:cron(8)
       Main PID: 981 (cron)
          Tasks: 1 (limit: 38136)
         Memory: 1.1M
            CPU: 1.491s
         CGroup: /system.slice/cron.service
                 └─981 /usr/sbin/cron -f -P
    Bash

    Say hello to this little process inside your system! This is a cron!
    (That reminds me of a famous Al Pacino quote… 😎)

    There is a lot of info in this message, and I am not quite familiar with the terminology. What is important for now is that this is about our cron.service which is a Regular background program processing daemon currently in active state and running since Sat 2023-06-10 09:55:40 EEST.

    Excellent! We now know what a cron looks like and how it spends its days.

    Using a cron to do our work

    You can set a cron to do whatever you imagine! Ooh, strong word, right? 😯 Examples, pleaseFair enough… 🤓

    You could use a cron to:

    • Send emails to your clients.
    • Have a backup for specific files in your system.
    • Remind yourself of a specific task you have to do.
    • Assign a cron to do heavy-duty work when your machine’s resources are used the least.

    But wait… that doesn’t make sense. Why would I need to send an email to my clients, every minute?

    Well, I said a cron checks every minute, after all, didn’t I?

    True, that is correct, it would (probably!) not make sense, but I also didn’t say that we have to do something every minute. I just said that the cron will check every minute if it has something to do.

    We can schedule it to do something whenever we want, every minute, every hour, every end of the month, once a year, etc, by creating a cron job.

    Once you define what is a cron job for your needs it becomes a reliable tool for task automation.

    What is a cron job?

    So what is a cron job exactly? In simple terms, a cron job is a task, that is automated and set to repeat. This task is saved in a file called crontab and it will execute automatically based on your set schedule.

    By understanding what is a cron job, you unlock a powerful way to automate repetitive tasks effortlessly. Whether it’s running scripts, performing backups, or scheduling system maintenance, cron jobs ensure that tasks are executed reliably and on time without manual intervention.

    How to schedule cron jobs with time syntax

    Now that you know what is a cron job and how it automates tasks, the next step is understanding how to schedule it. The timing of a cron job is defined using specific fields that allow you to set it to run at precise intervals. Whether you need a task to run every minute, daily, or on specific days of the week, learning how to configure these settings is essential for mastering cron jobs. Let’s dive into the details!

    We use the following formatting when we add a cron job to specify when we want our task to run:

    <when> <what>

    when: when we want something to happen.

    what: what we want our cron to do at that point in time.

    Let’s see the cron job formatting in more detail before we discover where to write a cron job. For our cron to understand when something should happen we need to add the following information:

    minute
    hour
    day of month
    month
    day of week

    What is this? 😩 All good, we’ll figure it out.

    We need to find a way to describe in great detail and without any doubts when a job (a cron’s task) should be executed. By combining these columns, we can define any point in time we want our job to run. Let’s figure out more, through the following examples. 🧐

    If we wanted to ask a cron to do something every minute, we should write it like this:

    Cron job every minute

    minute
    hour
    day of month
    month
    day of week
    *
    *
    *
    *
    *

    Using * is the same as saying, every minute of every hour of every day of the month…

    Cron job every 5 minutes

    minute
    hour
    day of month
    month
    day of week
    5
    *
    *
    *
    *

    Populating only the minute field will run the cron job every 5 minutes

    Cron job daily at 10:00 am

    minute
    hour
    day of month
    month
    day of week
    0
    10
    *
    *
    *

    See that we set the hour column to 10 and minute to 0? This means that our task will run only in the first minute of the 10th hour. If we wanted our task to run every minute of the 10th hour we should set the minute column to *.

    Cron job every Saturday at 10:00 am

    minute
    hour
    day of month
    month
    day of week
    0
    10
    *
    *
    6

    Saturday is the sixth day of the week so we define it by adding the number 6 on the “day of week column.

    Cron job on the 1st of every month at 15:30

    minute
    hour
    day of month
    month
    day of week
    30
    15
    1
    *
    *

    Cron job daily for the first week of the month

    minute
    hour
    day of month
    month
    day of week
    0
    0
    1-7
    *
    6

    We can also use duration, in this case, 1-7 is used for all days, starting from the 1st till the 7th.

    Cron job every 30 minutes during working hours

    minute
    hour
    day of month
    month
    day of week
    */30
    10-18
    *
    *
    *

    There is an awesome site called crontab guru if you’d like to play around and see more complex cases of cron time settings. I suggest you check it out and bookmark it, it will come in handy, trust me!

    Understanding the crontab file

    Now that we are a bit more familiar with the way we set the time for our cron job, let’s see the where part.

    There’s a file in our system called crontab. The word crontab comes from the combination of the words cron + table. This is the file in which we will be adding our instructions on what we want our cron to do and when we would like that to happen.

    You can find the crontab file living inside the /var/spool/cron/crontabs folder. In thecrontabs folder, you will find one crontab file per system user, in my case,e my crontab file name was george. Do not edit this file directly though, if you want to edit your assigned file, type in your terminal:

    crontab -e
    Bash

    ℹ️ -e stands for edit.

    If it is the first time you open crontab you might be asked to select your preferred editor, I prefer vim, you can select whatever you like.

    Select an editor.  To change later, run 'select-editor'.
      1. /bin/nano        <---- easiest
      2. /usr/bin/vim.basic
      3. /usr/bin/vim.tiny
      4. /bin/ed
    Bash

    In my case, pressing 2 and hitting Enter my crontab opened.

    # Edit this file to introduce tasks to be run by cron.
    # 
    # Each task to run has to be defined through a single line
    # indicating with different fields when the task will be run
    # and what command to run for the task
    # 
    # To define the time you can provide concrete values for
    # minute (m), hour (h), day of month (dom), month (mon),
    # and day of week (dow) or use '*' in these fields (for 'any').
    # 
    # Notice that tasks will be started based on the cron's system
    # daemon's notion of time and timezones.
    # 
    # Output of the crontab jobs (including errors) is sent through
    # email to the user the crontab file belongs to (unless redirected).
    # 
    # For example, you can run a backup of all your user accounts
    # at 5 a.m every week with:
    # 0 5 * * 1 tar -zcf /var/backups/home.tgz /home/
    # 
    # For more information see the manual pages of crontab(5) and cron(8)
    # 
    # m h  dom mon dow   command
    ~                                                                               
    ~

    Under the last line of this file, (# m h dom mon dow command) let’s write our first actual cron job! 🥳🥳🥳

    Write your first cron job command

    Our first cron job will be running every minute so that we can start our victory dance as soon as possible 🤭

    # m h  dom mon dow   command
    # my first cron job instructions 
                                                                                  
    * * * * * echo "This is my FIRST CRON!!! :)" > /dev/pts/1

    Let’s break down a bit this command

    # m h  dom mon dow   command
    # my first cron job instructions 
                                                                                  
    * * * * * echo "This is my FIRST CRON!!! :)" > /dev/pts/1

    Starting a line with a # indicates that this is a comment. Adding comments could help if you have, for example, more than one crons and it gets difficult to understand what each of them does.
    Watch out not to add comments in line with your cron job command since they will be considered as a part of the command.

    White spaces and blank lines are ignored in this file so feel free to format it however you’d like.

    # m h  dom mon dow   command
    # my first cron instructions 
                                                                                  
    * * * * * echo "This is my FIRST CRON!!! :)" > /dev/pts/1

    * * * * * These are the 5 values of the columns we described in our previous section. Don’t forget to add spaces between each *.

    echo "This is my FIRST CRON!!! :)" displays the message “This is my FIRST CRON!!! :)”.

    ℹ️ echo is a Linux command used to print strings/texts on the terminal.

    > is a symbol used to take a command’s output and redirect it somewhere else. So in this case the result of the echo command – what the echo command would print in the cron’s terminal – will be redirected to the next argument 👇

    /dev/pts/1 #%$#@? 😟 Oh sorry I think I accidentally wrote my actual thought when I searched about it 🤓. I was trying to create a cron that just prints/displays a message in the terminal.

    The problem is that crons have their own console so I needed to explicitly ask our cron to display a message in the terminal I am using. 
    To find which terminal I was using, I typed in my terminal, tty and got the following response

    ~ tty
    /dev/pts/1
    Bash

    So I added this terminal’s description in my cron command.

    To wrap this up we’d say that we asked our first cron job to display the message This is my FIRST CRON!!! :) to our currently open terminal.

    By saving and closing the crontab file you should see a message crontab: installing new crontab which informs you that all changes added to your crontab file were saved.

    At the beginning of the next minute, you should see in your terminal your first cron running.

    Wait for it…. wait waaaaaaaaait waiiiit (brings back memories from Braveheart!) now! Did you see it????? 🥳🥳🥳🥳

    This is my FIRST CRON!!! :)
    Bash

    This message will show up every minute forever so you probably need to edit your crontab and remove this cron, after all, it was just for learning purposes! 🤭

    (Just type crontab -e and remove the cron job you have added to do so.)

    How to view cron logs

    If you haven’t modified your system settings, then by default, all system logs are kept in the /var/logs/systemlog file. Typing the following command in your terminal will get you all CRON-related logs written in your system

    grep CRON /var/log/syslog
    Bash

    ℹ️ grep command searches for patterns inside a file

    In my case, the result looked like

    Mar 24 20:18:01 george CRON[224509]: (george) CMD (echo "This is my FIRST CRON!!! :)" > /dev/pts/5)
    Mar 24 20:19:01 george CRON[224892]: (george) CMD (echo "This is my FIRST CRON!!! :)" > /dev/pts/5)
    Mar 24 20:20:01 george CRON[225143]: (george) CMD (echo "This is my FIRST CRON!!! :)" > /dev/pts/5)
    Mar 24 20:21:01 george CRON[225356]: (george) CMD (echo "This is my FIRST CRON!!! :)" > /dev/pts/5)
    Bash

    This is, I guess, one way you can use to check what’s going on with your crons and when they ran.

    And there you have it! You created your first cron and saw all the little details about your new cron job! Well done! It’s time for more victory dance!