Quick-start guides, tool introductions, and environment setup tutorials. Whether you’re installing Git, configuring Jest, or learning Homebrew — this is your launchpad.
If you are making your first steps in code testing, I want to start by congratulating you on walking that path! 🥳 This is a crucial decision and a great addition to your skill set. Before writing some tests, it’s vital to grasp the difference between two fundamental testing methods regarding integration and unit tests. In this post, we’ll dive into these testing types and explore their differences.
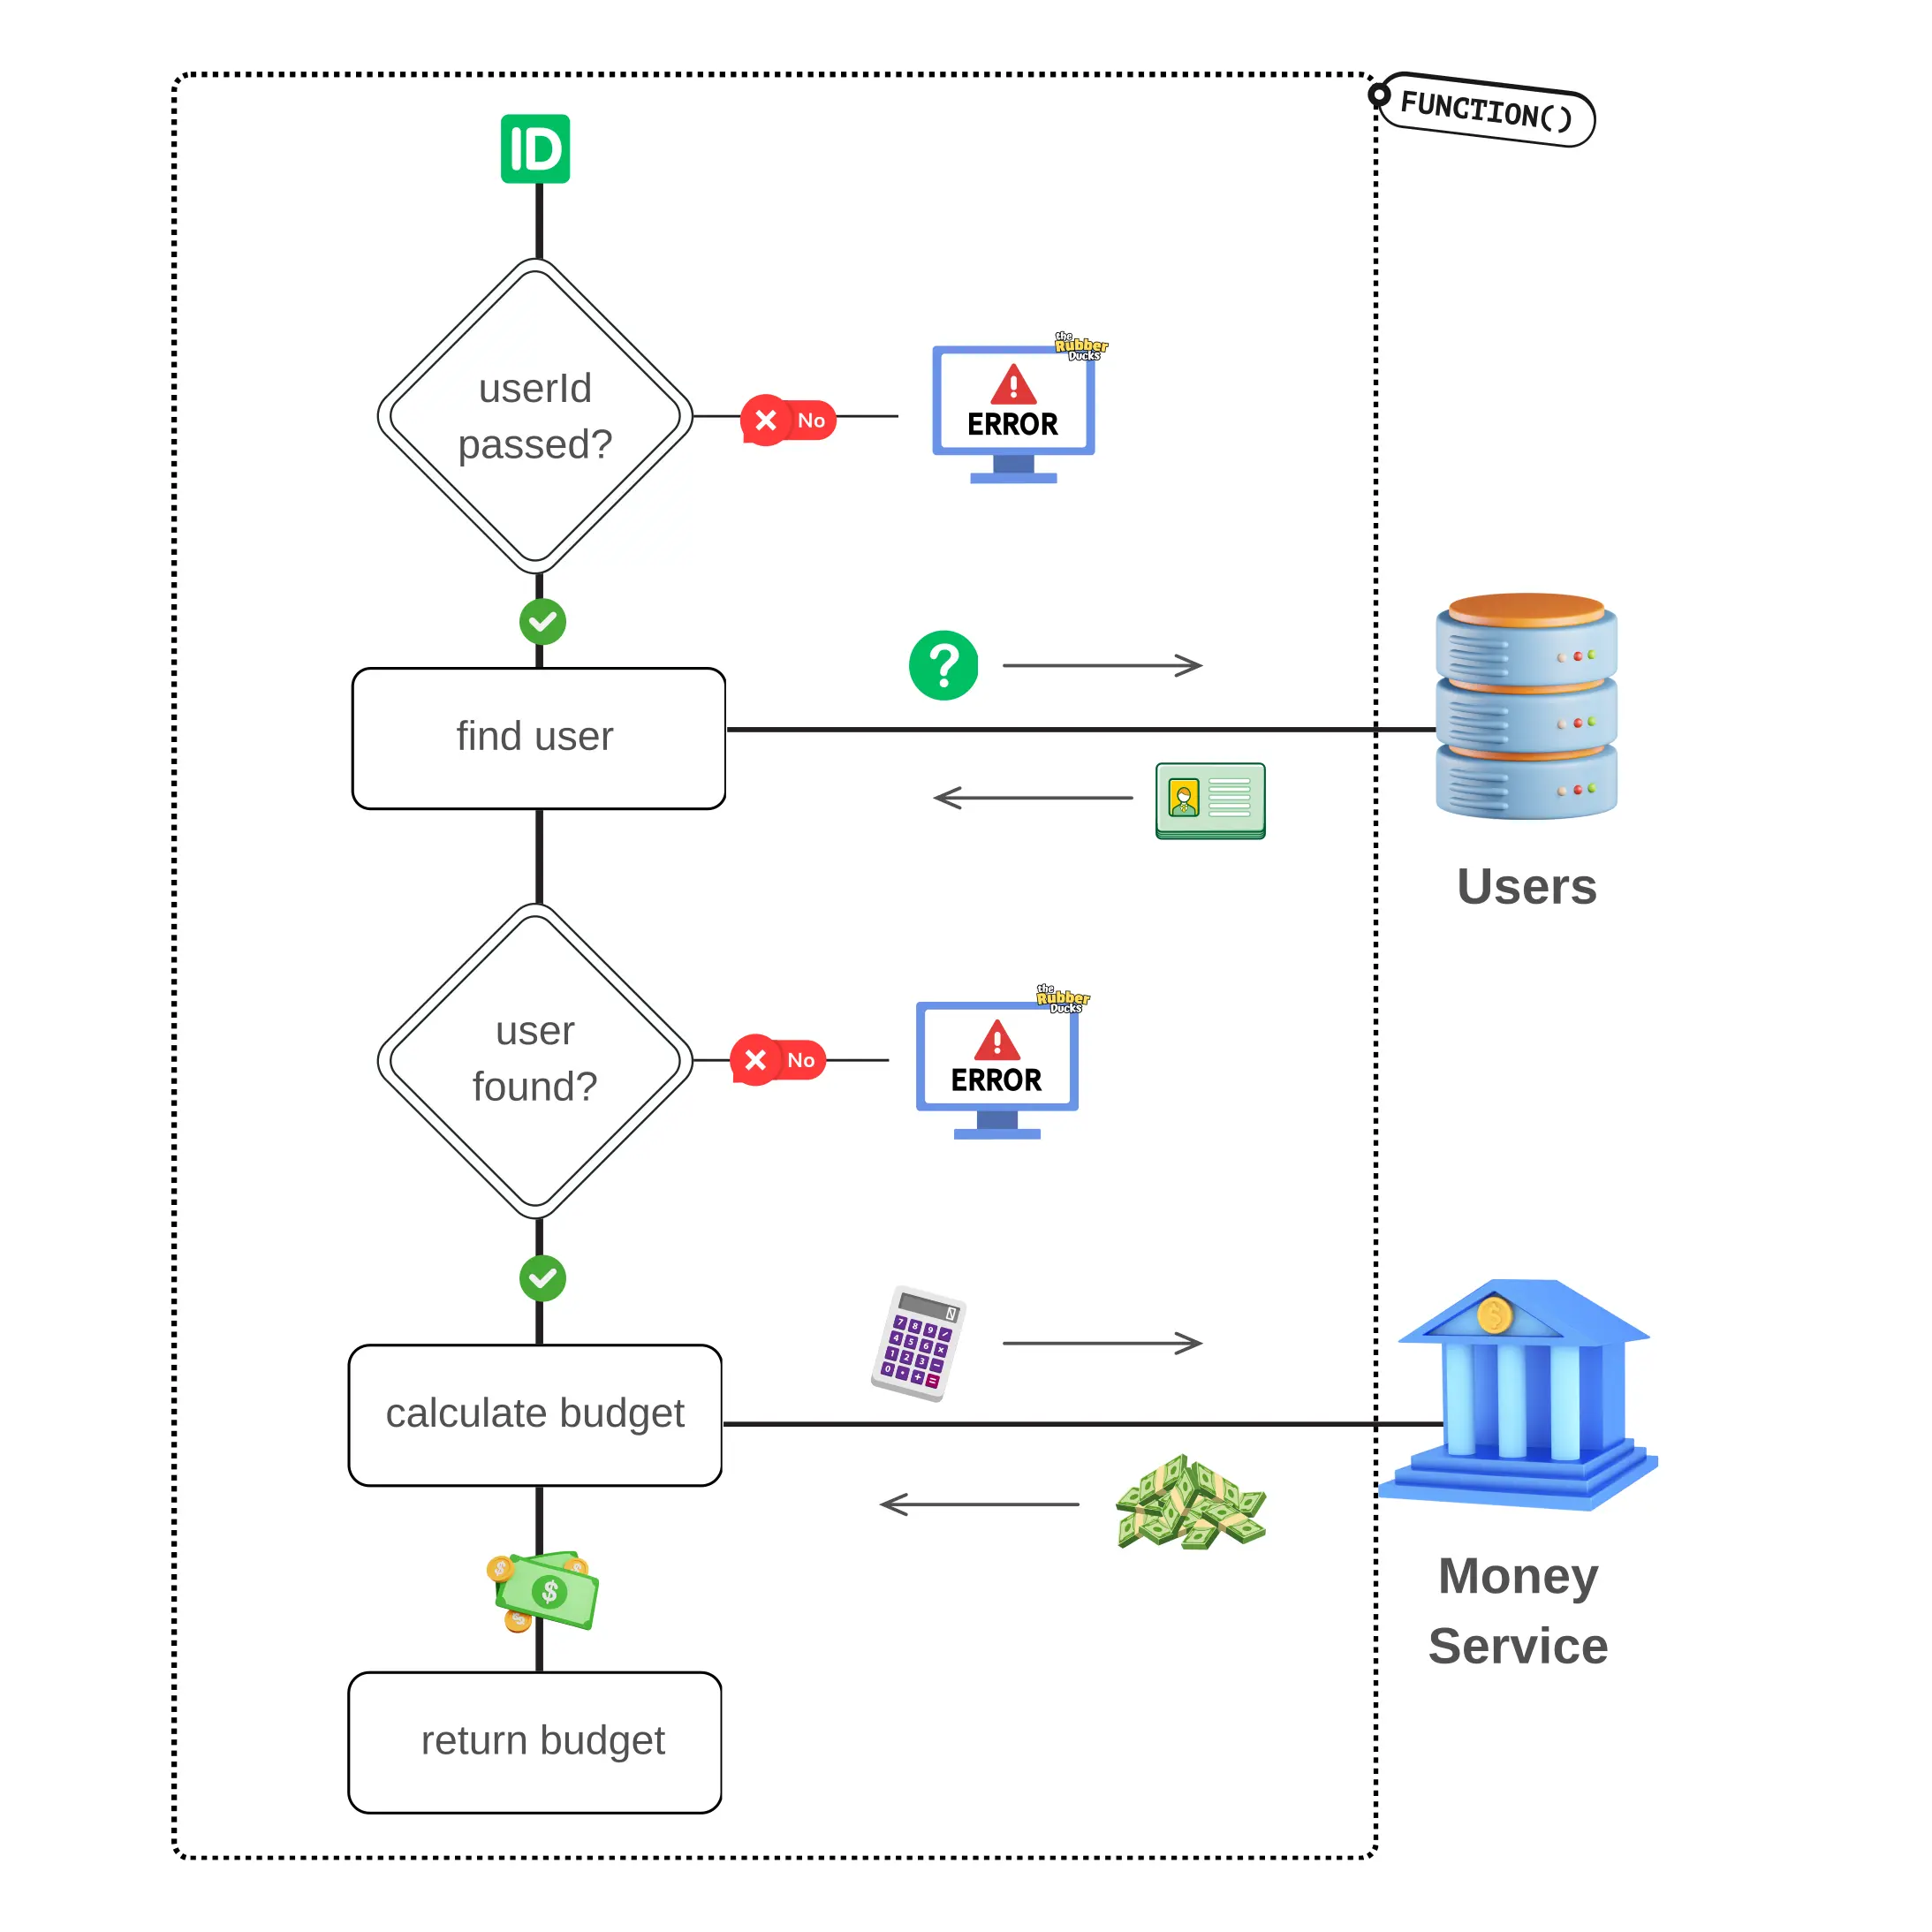
To understand the difference between integration and unit tests, let’s use an example of a function that calculates a user’s daily budget. We’ll name our function determineUserBudget and have the following flow:
Takes a userId parameter to perform a search for a user.
Uses the provided userId to search for the corresponding user in the Users table of our database.
If we call the function without passing a userId, it will throw an Error to indicate the missing parameter.
Furthermore, if no user is found, it will also throw an Error to signify the absence of a matching user.
However, if a user is found, it will use the user’s info and call our Budget service.
Subsequently, it will perform budget calculations based on the retrieved data.
Lastly, the function will return the budget as its final output.
Let’s see what was just described through the following diagram so that it is easier to understand the function flow:
To differentiate between the internal workings of the function and the external connections that need to be made, I am using a dotted border.
Now that we have our testing scenario, let’s see what’s the difference between these two types of testing, and how we would test our function in each method.
(We won’t be writing any code in this post).
What is a unit test?
When writing a unit test we want to isolate the part of the code we are testing from the rest of the system.
This Is The Main Characteristic Of Unit Tests, Isolation!
Consider it as if you are focusing all your energy only on what’s happening inside a function without any regard for the function’s calls/interactions with the database, services, or any other invoked functions.
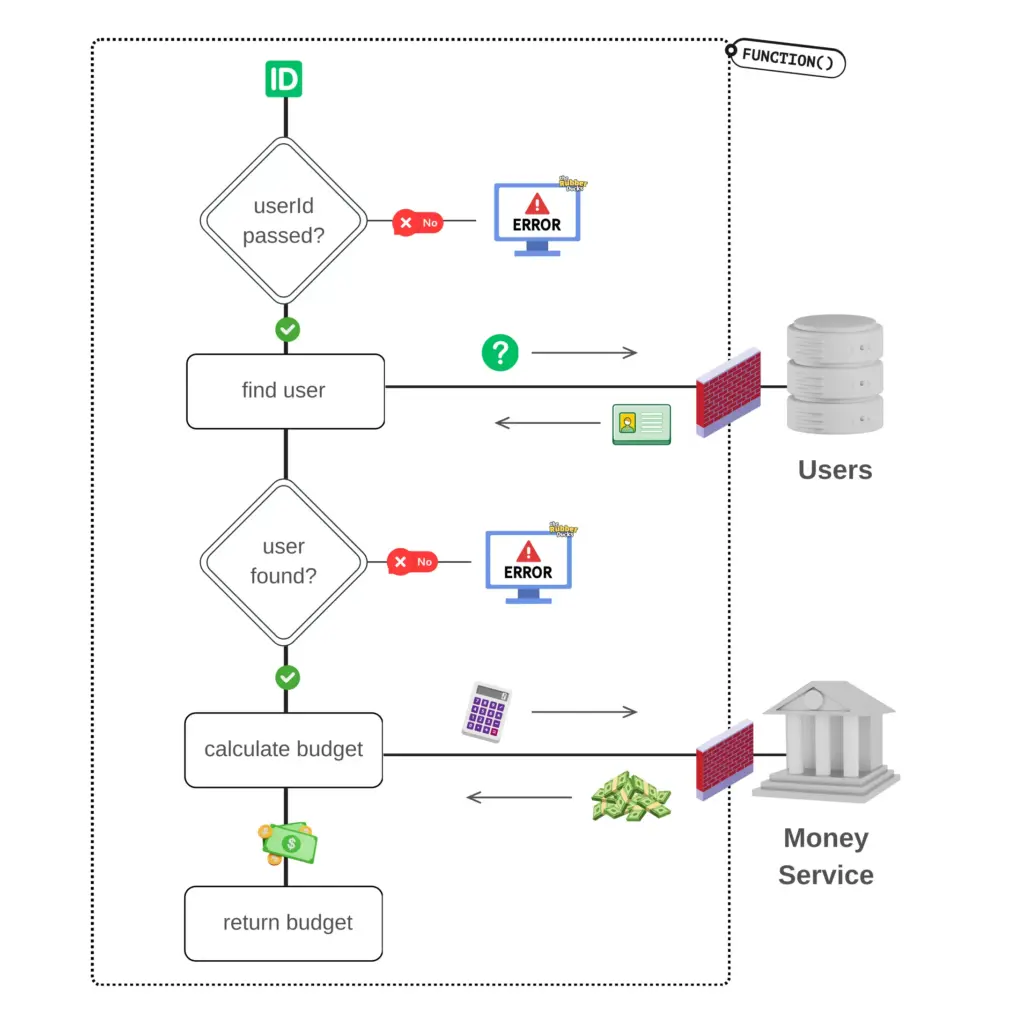
In our scenario, to unit test determineUserBudget , we’ll ignore the call to our database and the call to the money service. Our focus will solely be on testing if all potential function flows (see green arrows) are followed as expected.
So, for the unit testing methodology, here are some testing scenarios we could write regardless of the testing suite, to ensure comprehensive coverage of your function:
it should throw an error if no userId is passed.
it should make a call to the database if the correct userId is passed.
it should throw an error if no user is found.
it should contact the Money service if a user is found.
it should return the calculated user’s budget
However, what about the two calls in the database and service? How can we isolate our function from these calls?
When writing unit tests we need to substitute the external calls with mock functions so that we can simulate the call without actually making it.
A mock function is a function that replaces the behavior of an actual function during the testing.
To create an effective mock function, it’s essential to understand the response type and structure of the function being replaced. Understanding the response type and structure allows us to mimic the behavior of the original function and ensure that the mocked function provides the expected data during our testing.
After replacing the external calls with mocked ones we can safely focus on testing the function without any interactions with the external environment. This isolation allows us to concentrate on the internal workings of the function and successfully unit test it.
In contrast with unit tests, the keyword on integration tests is not isolation but interaction. Through integration tests, we are testing how different parts of our code interact with each other.
The Key Word On Integration Tests Is Interaction!
In our testing scenario, we will test much more! We will test our function’s results, including the interaction with the database and the correctness of the budget returned. The difference with the unit test is that we will pass “real” data and receive back “real” data to test.
In the integration testing methodology, the following testing scenarios could be some examples you could use based on our use case:
it should return X budget when a user is approved.
it should return Y budget when user is new.
it should follow Z budget calculation methodology when user is pending confirmation.
it should calculate the budget correctly for a user with a positive income and no expenses.
As you can see, the nature of our tests changed; we shifted our focus from testing the internal flow, to verifying our function produces the desired results, data, and budget.
Writing integration tests can be challenging because they require proper data preparation before executing the actual test. It’s quite common to spend more time during the initial steps to understand the required data and set up the necessary test environment before successfully executing the test.
Trusting external package providers
See that I didn’t mention testing the connection with the service? Well even if these are integration tests, they still don’t test connections with external services/providers.
Through integration tests, we are testing the way our functions interact with each other, not how they interact with external service functions. These functions are expected to have been tested by the service provider.
So, if for example you like using lodash and have used isEmpty in your function, you should not write unit tests about lodash isEmpty. It should be taken for granted that isEmpty is a black box for you that has been thoroughly tested by lodash’s developers.
Caution when using real data
It’s important to note that when I mention using real data, I am not referring to the same data used on the production site. Using production data in testing can lead to serious issues, like GDPR compliance and the leak of sensitive data.
Instead, by “real” data, I mean realistic/similar data, that the testing suite will use based on the testing environment. For example, when testing locally, the test would use data from the local database. When testing on a staging environment, the test would use data from the staging database.
A staging environment is an environment we use for testing features and bug fixes before deploying them on production. A safe simulation of a site or software used in production.
You should anticipate that these databases will be populated with data that is structured similarly to your production database, but not identical.
Which testing method to choose?
While there isn’t a definitive answer to this question if I had to answer that, I’d say, “It depends.” And yes I know you probably don’t like that answer. In that case, if I had to choose one answer, I would say that you always need to choose both types.
Unit tests are awesome for checking function flows, but integration tests are the best so that you may have a good night’s sleep! 😴 What I usually do is follow an approach that combines both. For complex functions, I write at least one integration test and multiple unit tests for each individual function the complex function relies on.
I consider writing tests a form of art, and while it may take time to master, incorporating it into your workflow will bring immense value. Once it becomes an integral part of your everyday workflow, you’ll experience a remarkable mind-shift that will not only enhance your testing skills but will also change the way you implement a feature. You’ll begin wearing two hats, the developer and the tester. By doing so, you’ll be able to proactively think about edge cases, error conditions, and much more while implementing your features!
I can assure you it’s a mind-blowing and life-changing process. So what are you waiting for? Go for it!!
So you’ve developed your cool Next.js project and now you are ready to deploy it and feel proud for having it live. First of all, kudos on that!! 🤩 After doing some research, you found that Render.com is a great choice to deploy a Next.js app, but you’re not sure how to do it. Let’s learn how to do it together.
Create your Next.js app
In case you are here and want to start from ground zero then you’ll need to create your app by typing in your terminal
npxcreate-next-app@latestmy-awesome-project
Bash
The Next.js setup will start asking some questions regarding your project’s settings. You may choose whatever you like, I made the following choices:
✔WouldyouliketouseTypeScript?Yes✔WouldyouliketouseESLint?Yes✔WouldyouliketouseTailwindCSS?No✔Wouldyouliketouse'src/'directory?Yes✔WouldyouliketouseAppRouter?Yes✔Wouldyouliketocustomizethedefaultimportalias (@/*)? No
Bash
Connect your project to GitHub
To deploy on Render.com we will be using a GitHub repository so it will now be a good idea to connect our app with one of our repos.
When creating a repository you are given a couple of ways to connect your local project with a remote one. From the ones mentioned in GitHub, since we have our project already initialized, we will be using the “push existing repository” method:
When you are done with pushing your changes, you will see all your code on the GitHub repository. Great, let’s proceed with Render.com and the deployment steps.
Create a Render.com service
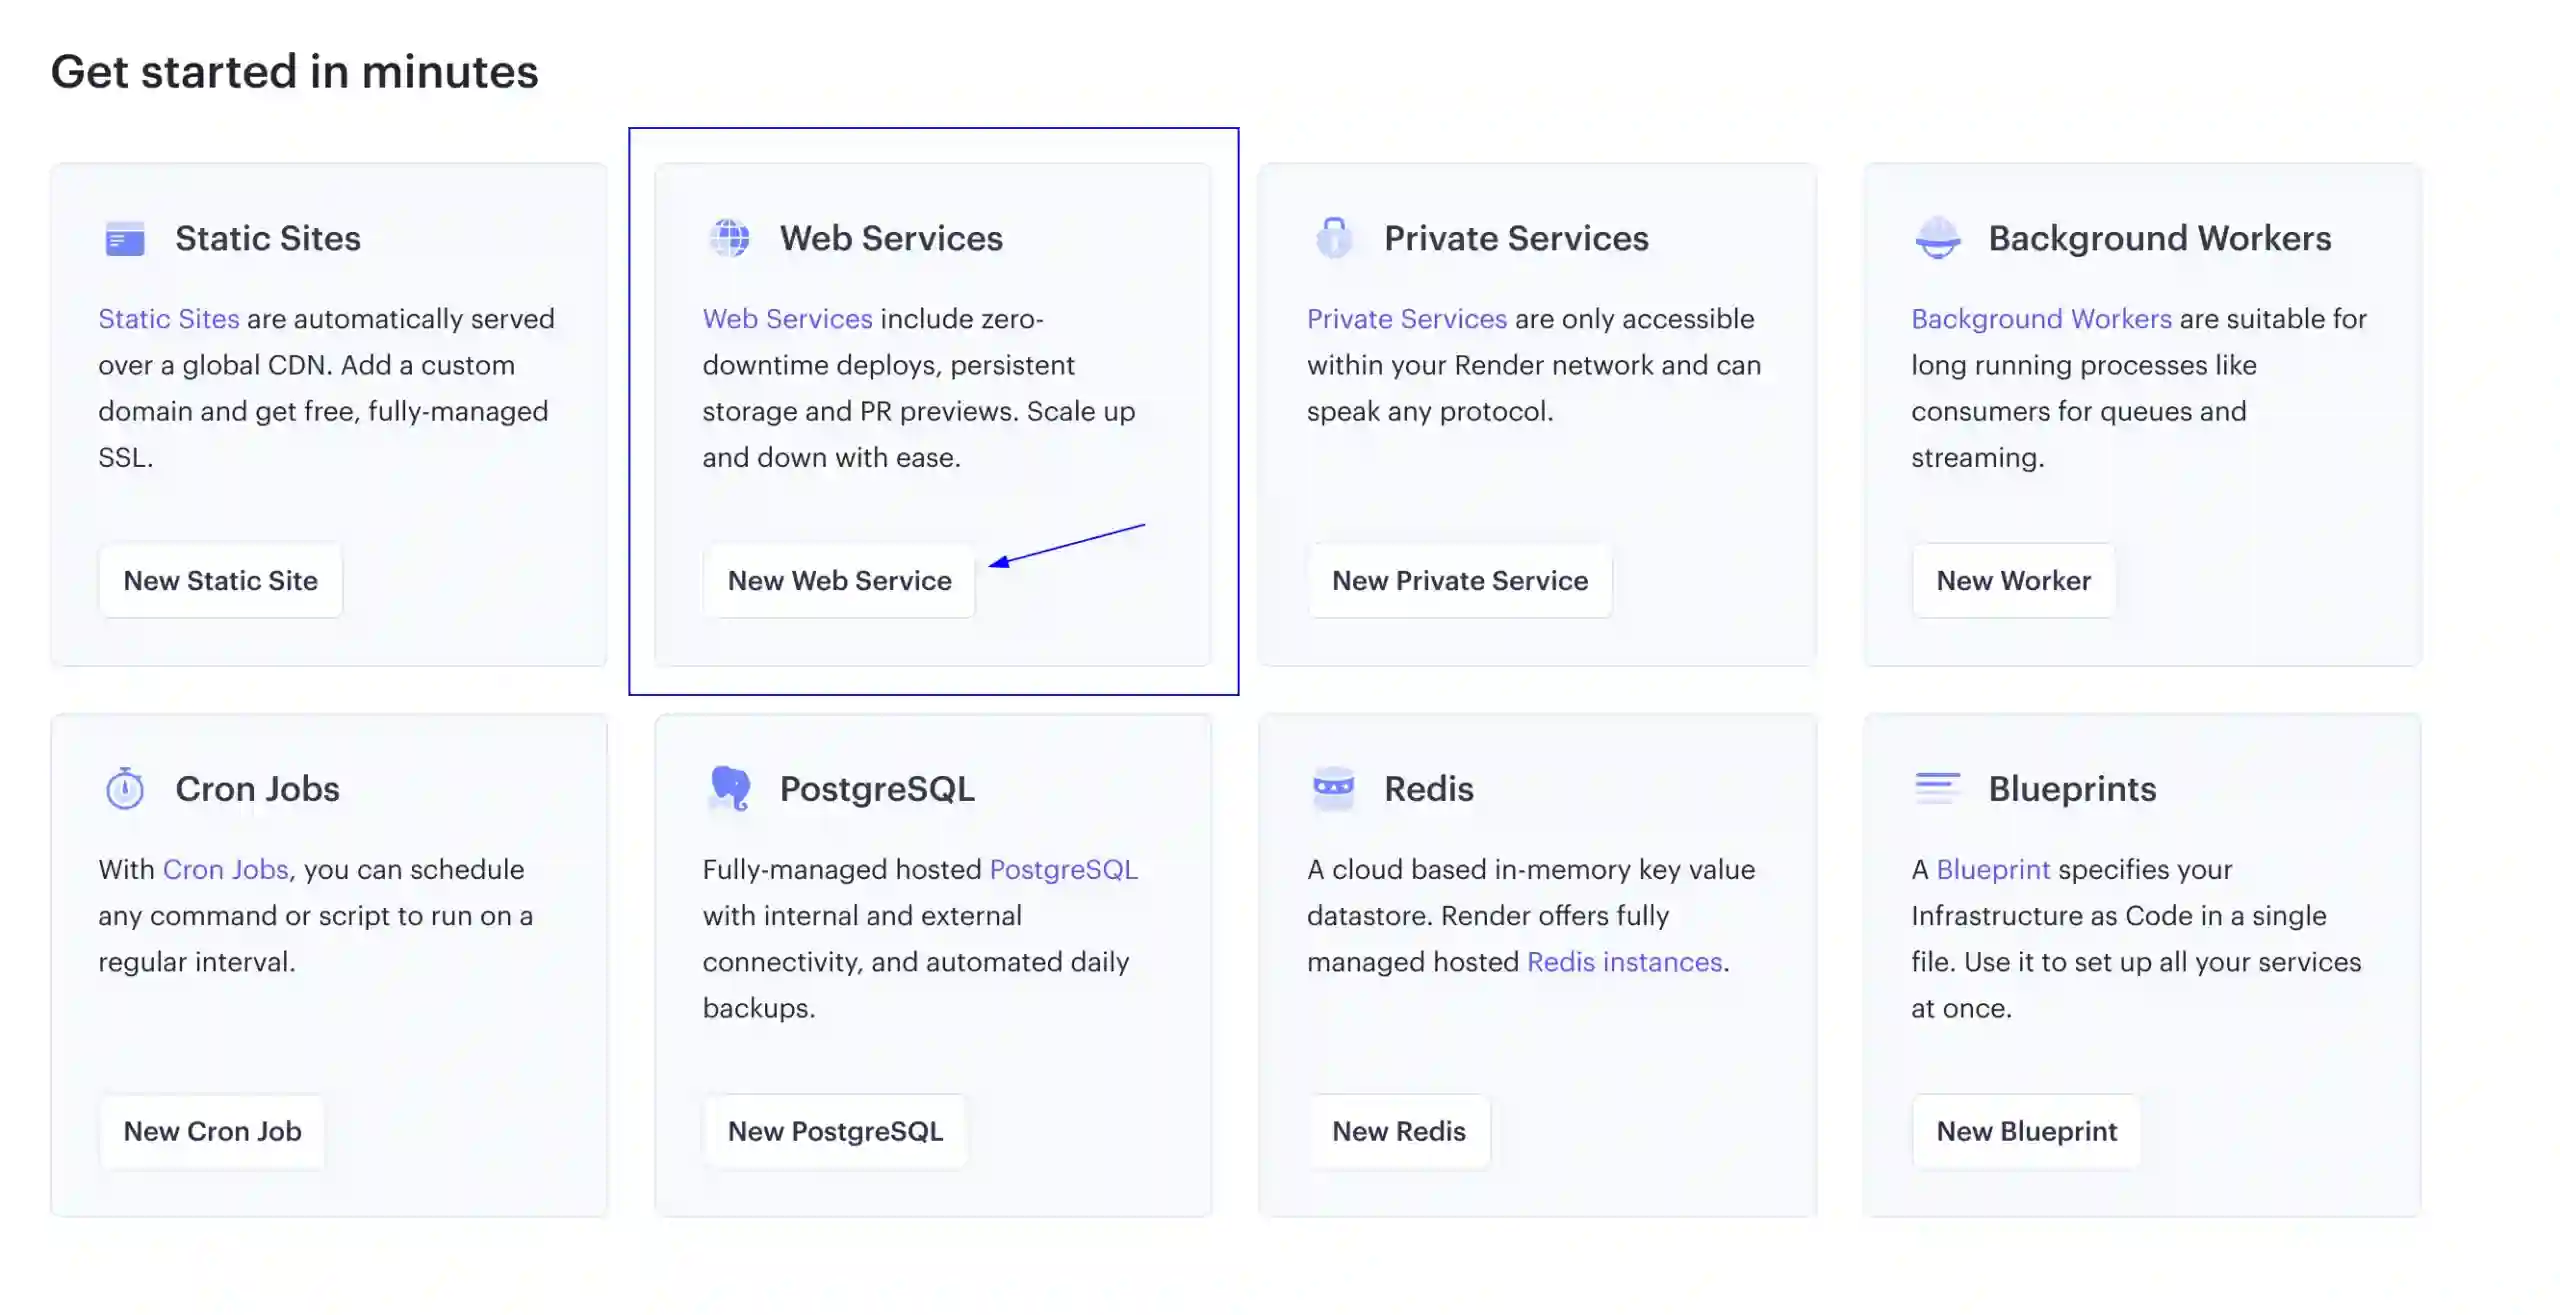
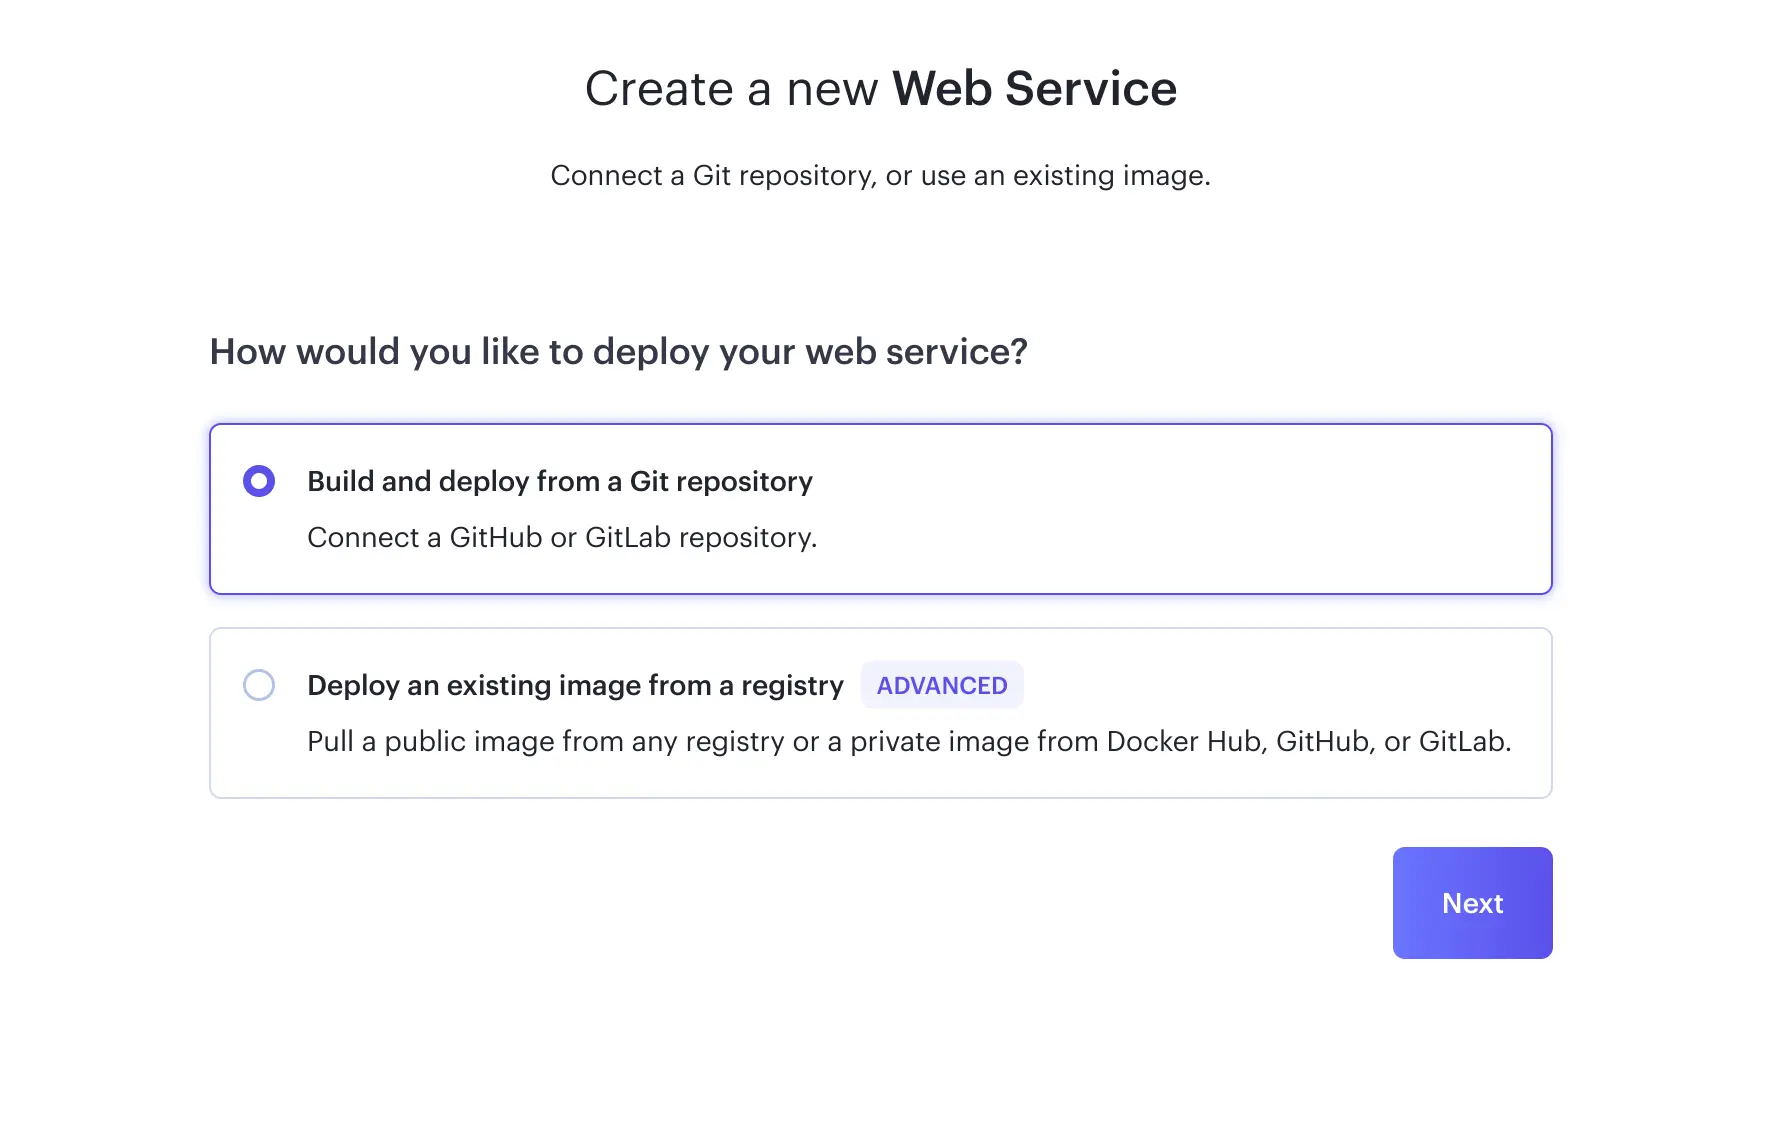
If you haven’t done so yet, make sure to sign up for a new account on Render.com. Next, you’ll need to create a new Web service
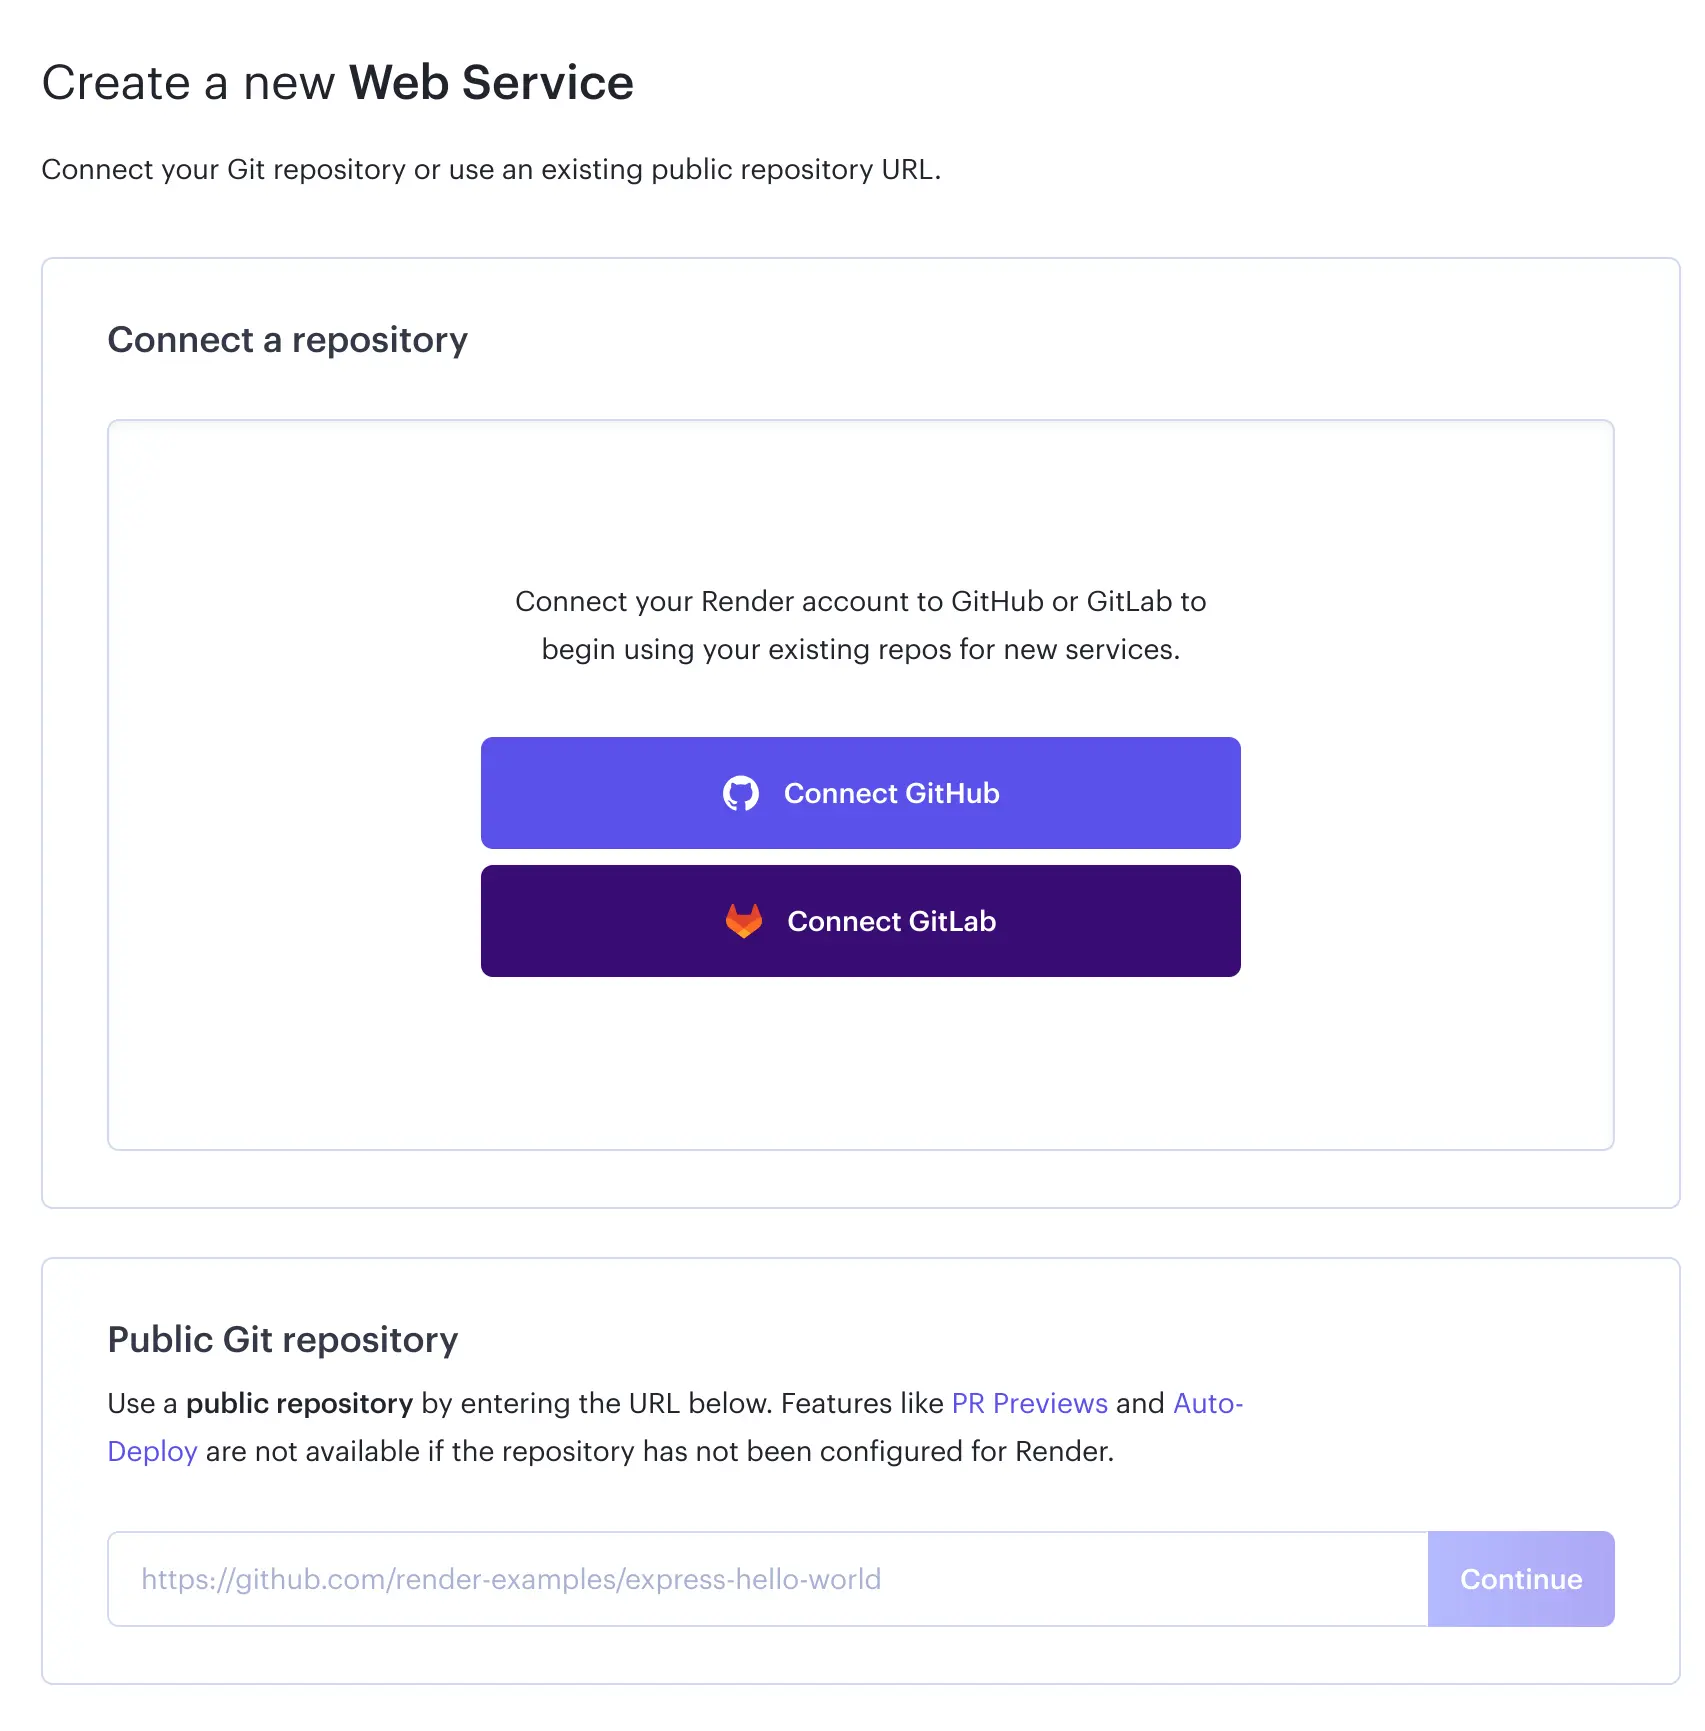
You will be asked to connect your GitHub/GitLab account or add your repo’s URL if it’s a public one. For this post, I’ve selected to connect my GitHub account since, in this case, my GitHub repository is a private one.
When creating your service, choose to deploy from a GitHub repository
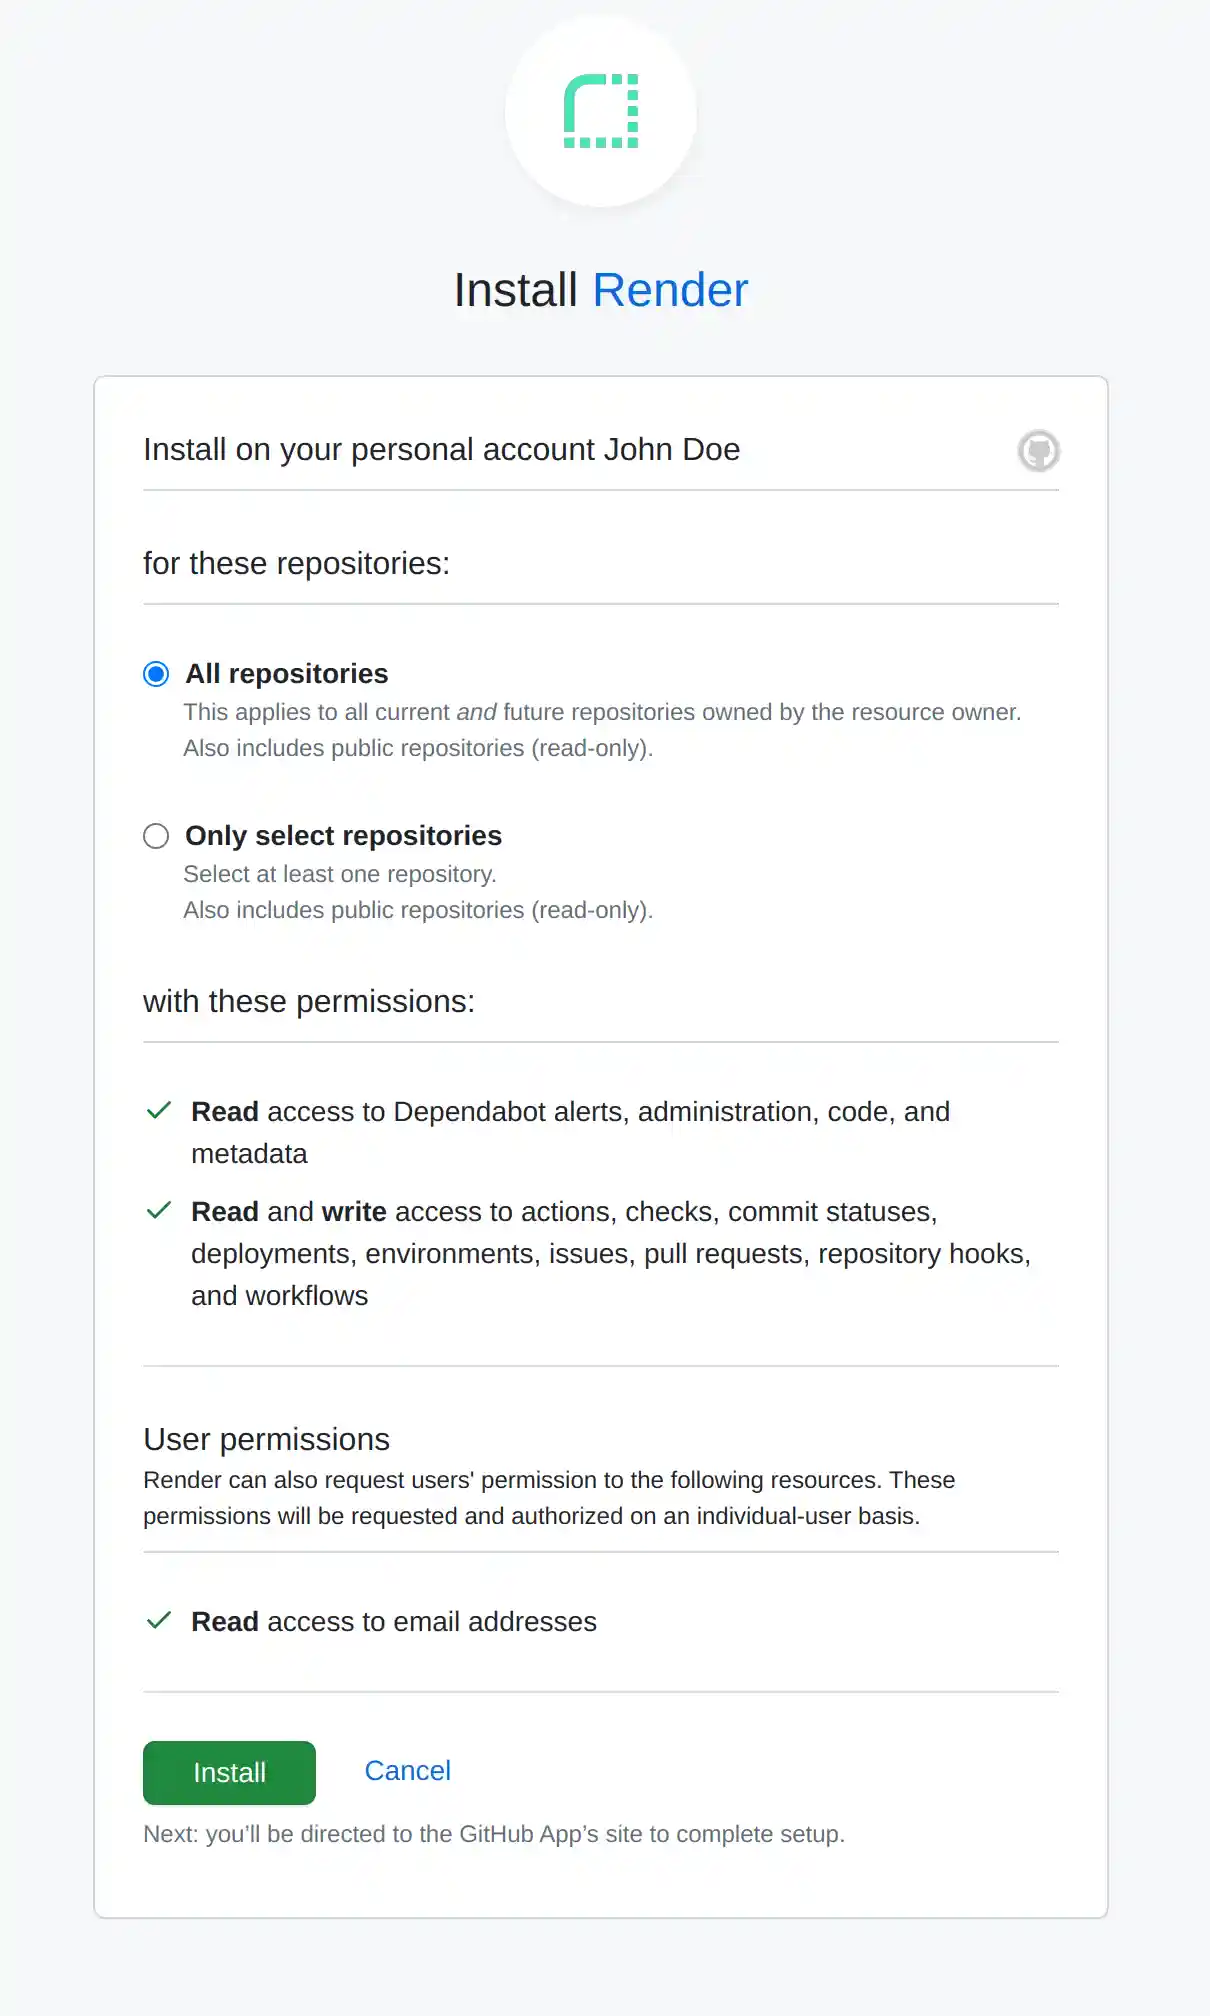
The next step would be to decide whether you’ll give access to all your repositories or just theone used by your project.
The choice is yours, but I decided to grant access only to the one I’m deploying.
If you followed my choice, the next step is to choose your repository in the “Connect a repository” section. Click “Connect” where it mentions your repository name. Now that it’s connected, let’s continue to adjust our service settings. We’re getting much closer to deploying our awesome Next.js app!
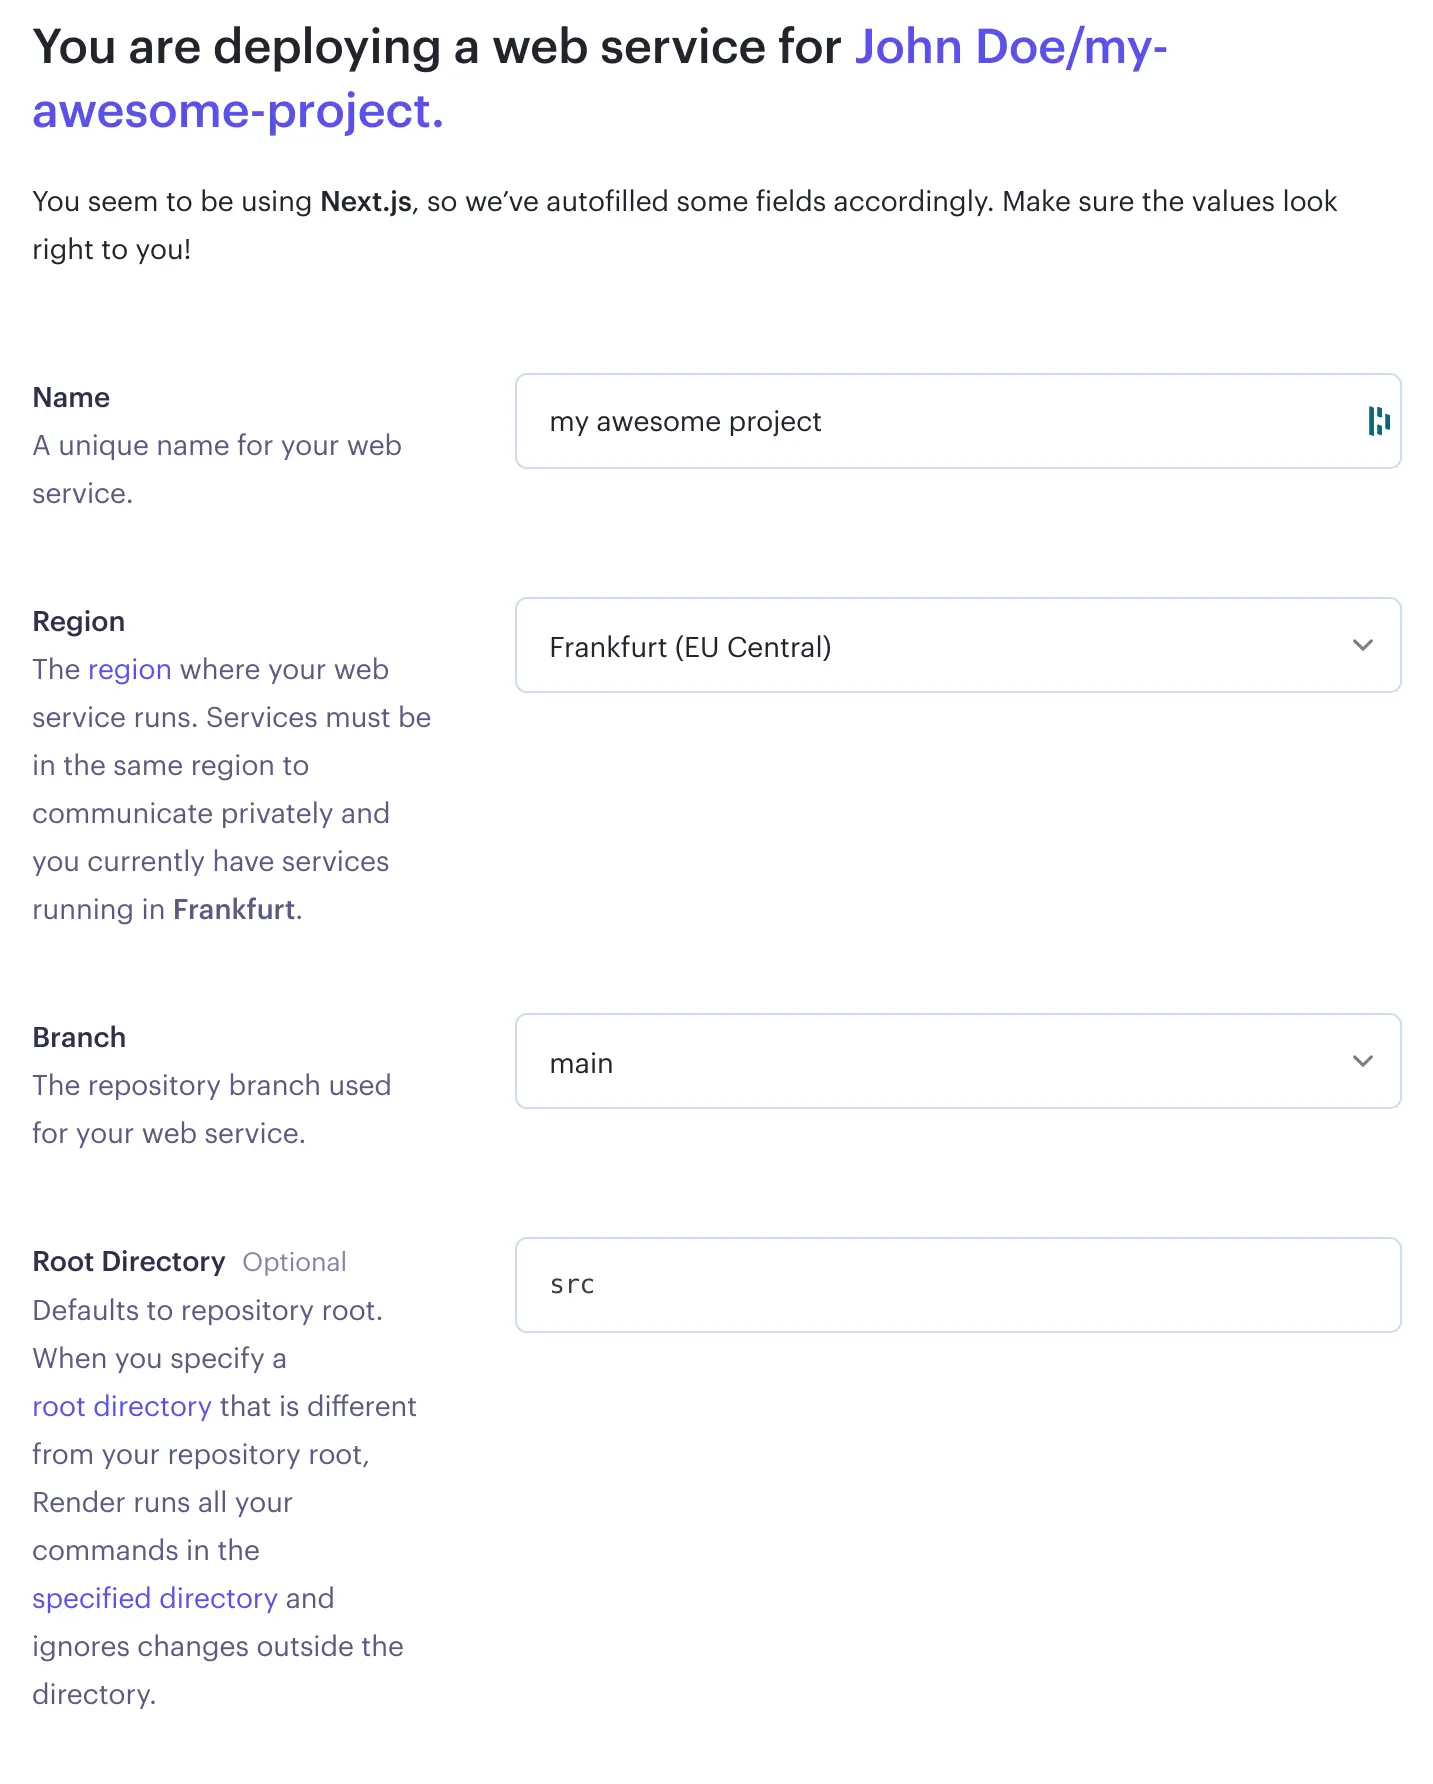
Before your first deployment starts you will need to choose your deployment settings based on your project characteristics. Because of this, keep in mind that our choices may differ. Let’s see the available options in few details:
Name Your project’s name is just a label to differentiate this service from your other Render.com services.
Region As clearly described, this is your server’s location.
Branch Your repository’s central branch. GitHub typically uses main as the default branch, but in older projects, you might encounter master being used as well.
Root Directory This, as mentioned, is optional. If you have built your project with the same setup options as I did, Next.js will have added a src root folder, so you’ll need to mention that here.
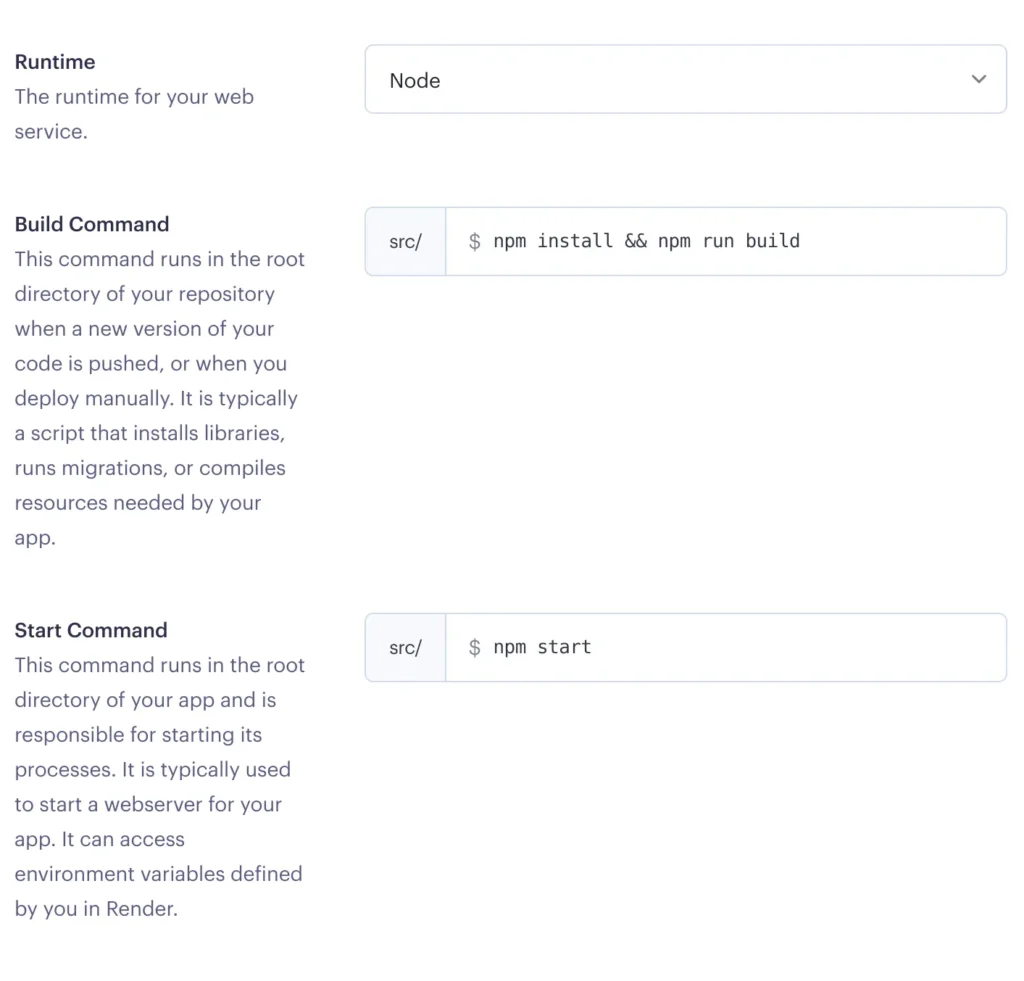
Let’s check the rest of the options provided:
Runtime The runtime environment your service will be using, I am guessing this will be Node for you too, but of course, change it accordingly if necessary.
Build Command You might see here the default option yarn; yarn build, if you are using yarn manager then leave it as is, my package manager choice was npm so I had to change it.
Start Command Same as the build command, the default prefilled option is yarn start, I have added npm start.
Don’t forget to select the Free instance type option so that you’re not charged for this service unless you have other plans in which case, you know better! 😎
Don’t worry if you are not sure about any of these settings, you can change them later.
At the bottom of your screen, hit “Create Web Service” to get this show on the road!
Start deployment
By default when a new Service is created, Render.com will start its deployment process based on the last commit you have pushed to your main branch (or the branch you’ve selected as your main one).
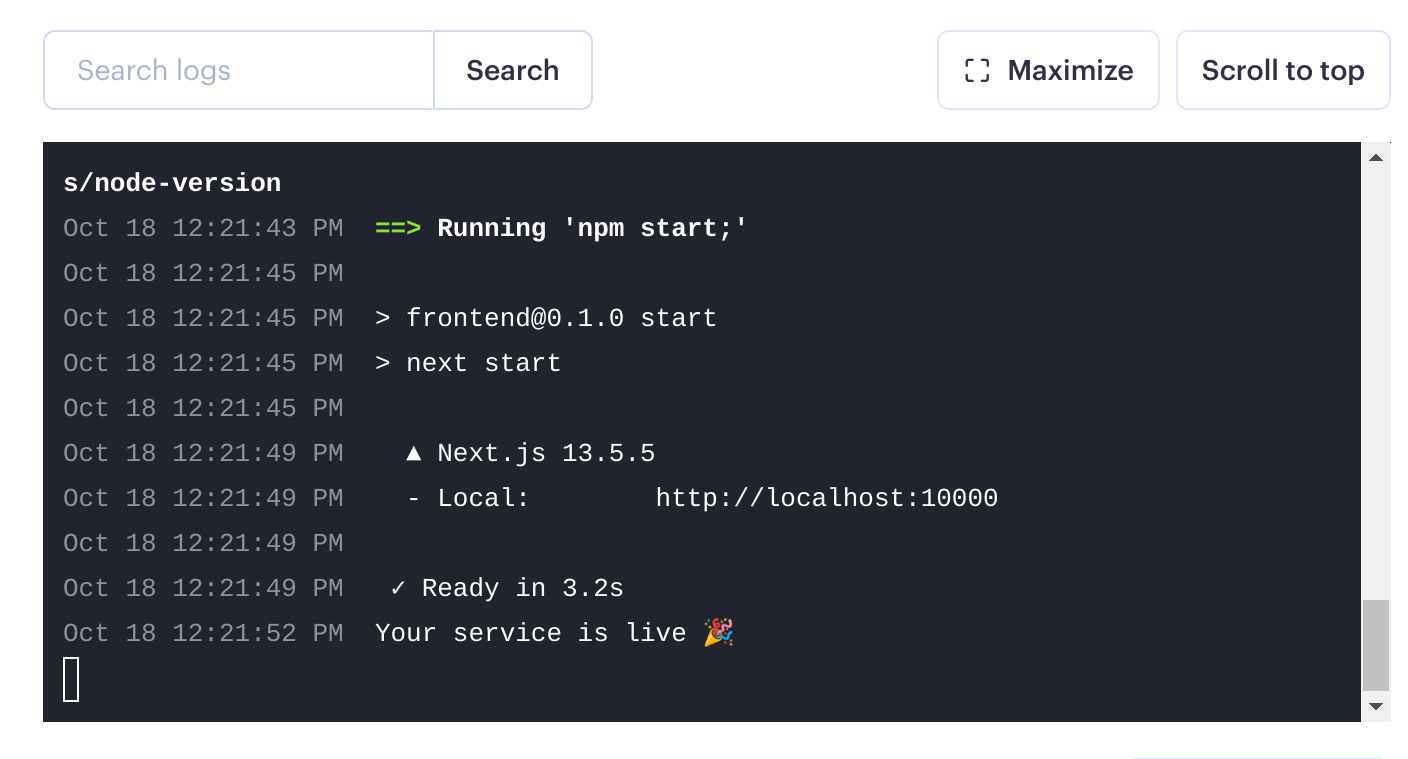
If your initial deployment went smoothly, you should see something like this:
In that case… congratulations!! 🥳🥳 To see your deployed app, underneath your service’s name, you’ll see a link, click that and you’ll get redirected to your app’s URL.
However, if you weren’t as luckyas I was 😕, you might be greeted by a not-so-pleasant red message saying “Build failed“. This being my first time working with deployment on a platform like Render.com, it was quite challenging to figure out why a straightforward Next.js project, without any complex configurations, failed to deploy.
So, if you’ve faced a similar situation,I’ve shared my findings on why my Render.com deployment failed, and I sincerely hope they come in handy and ease your frustrations.
Adding extra repositories to Render.com
If you initially connected only one repository to Render.com and you’re looking to create an additional Web Service, you’ll notice that you have only that repository as the sole available option for connecting your new service.
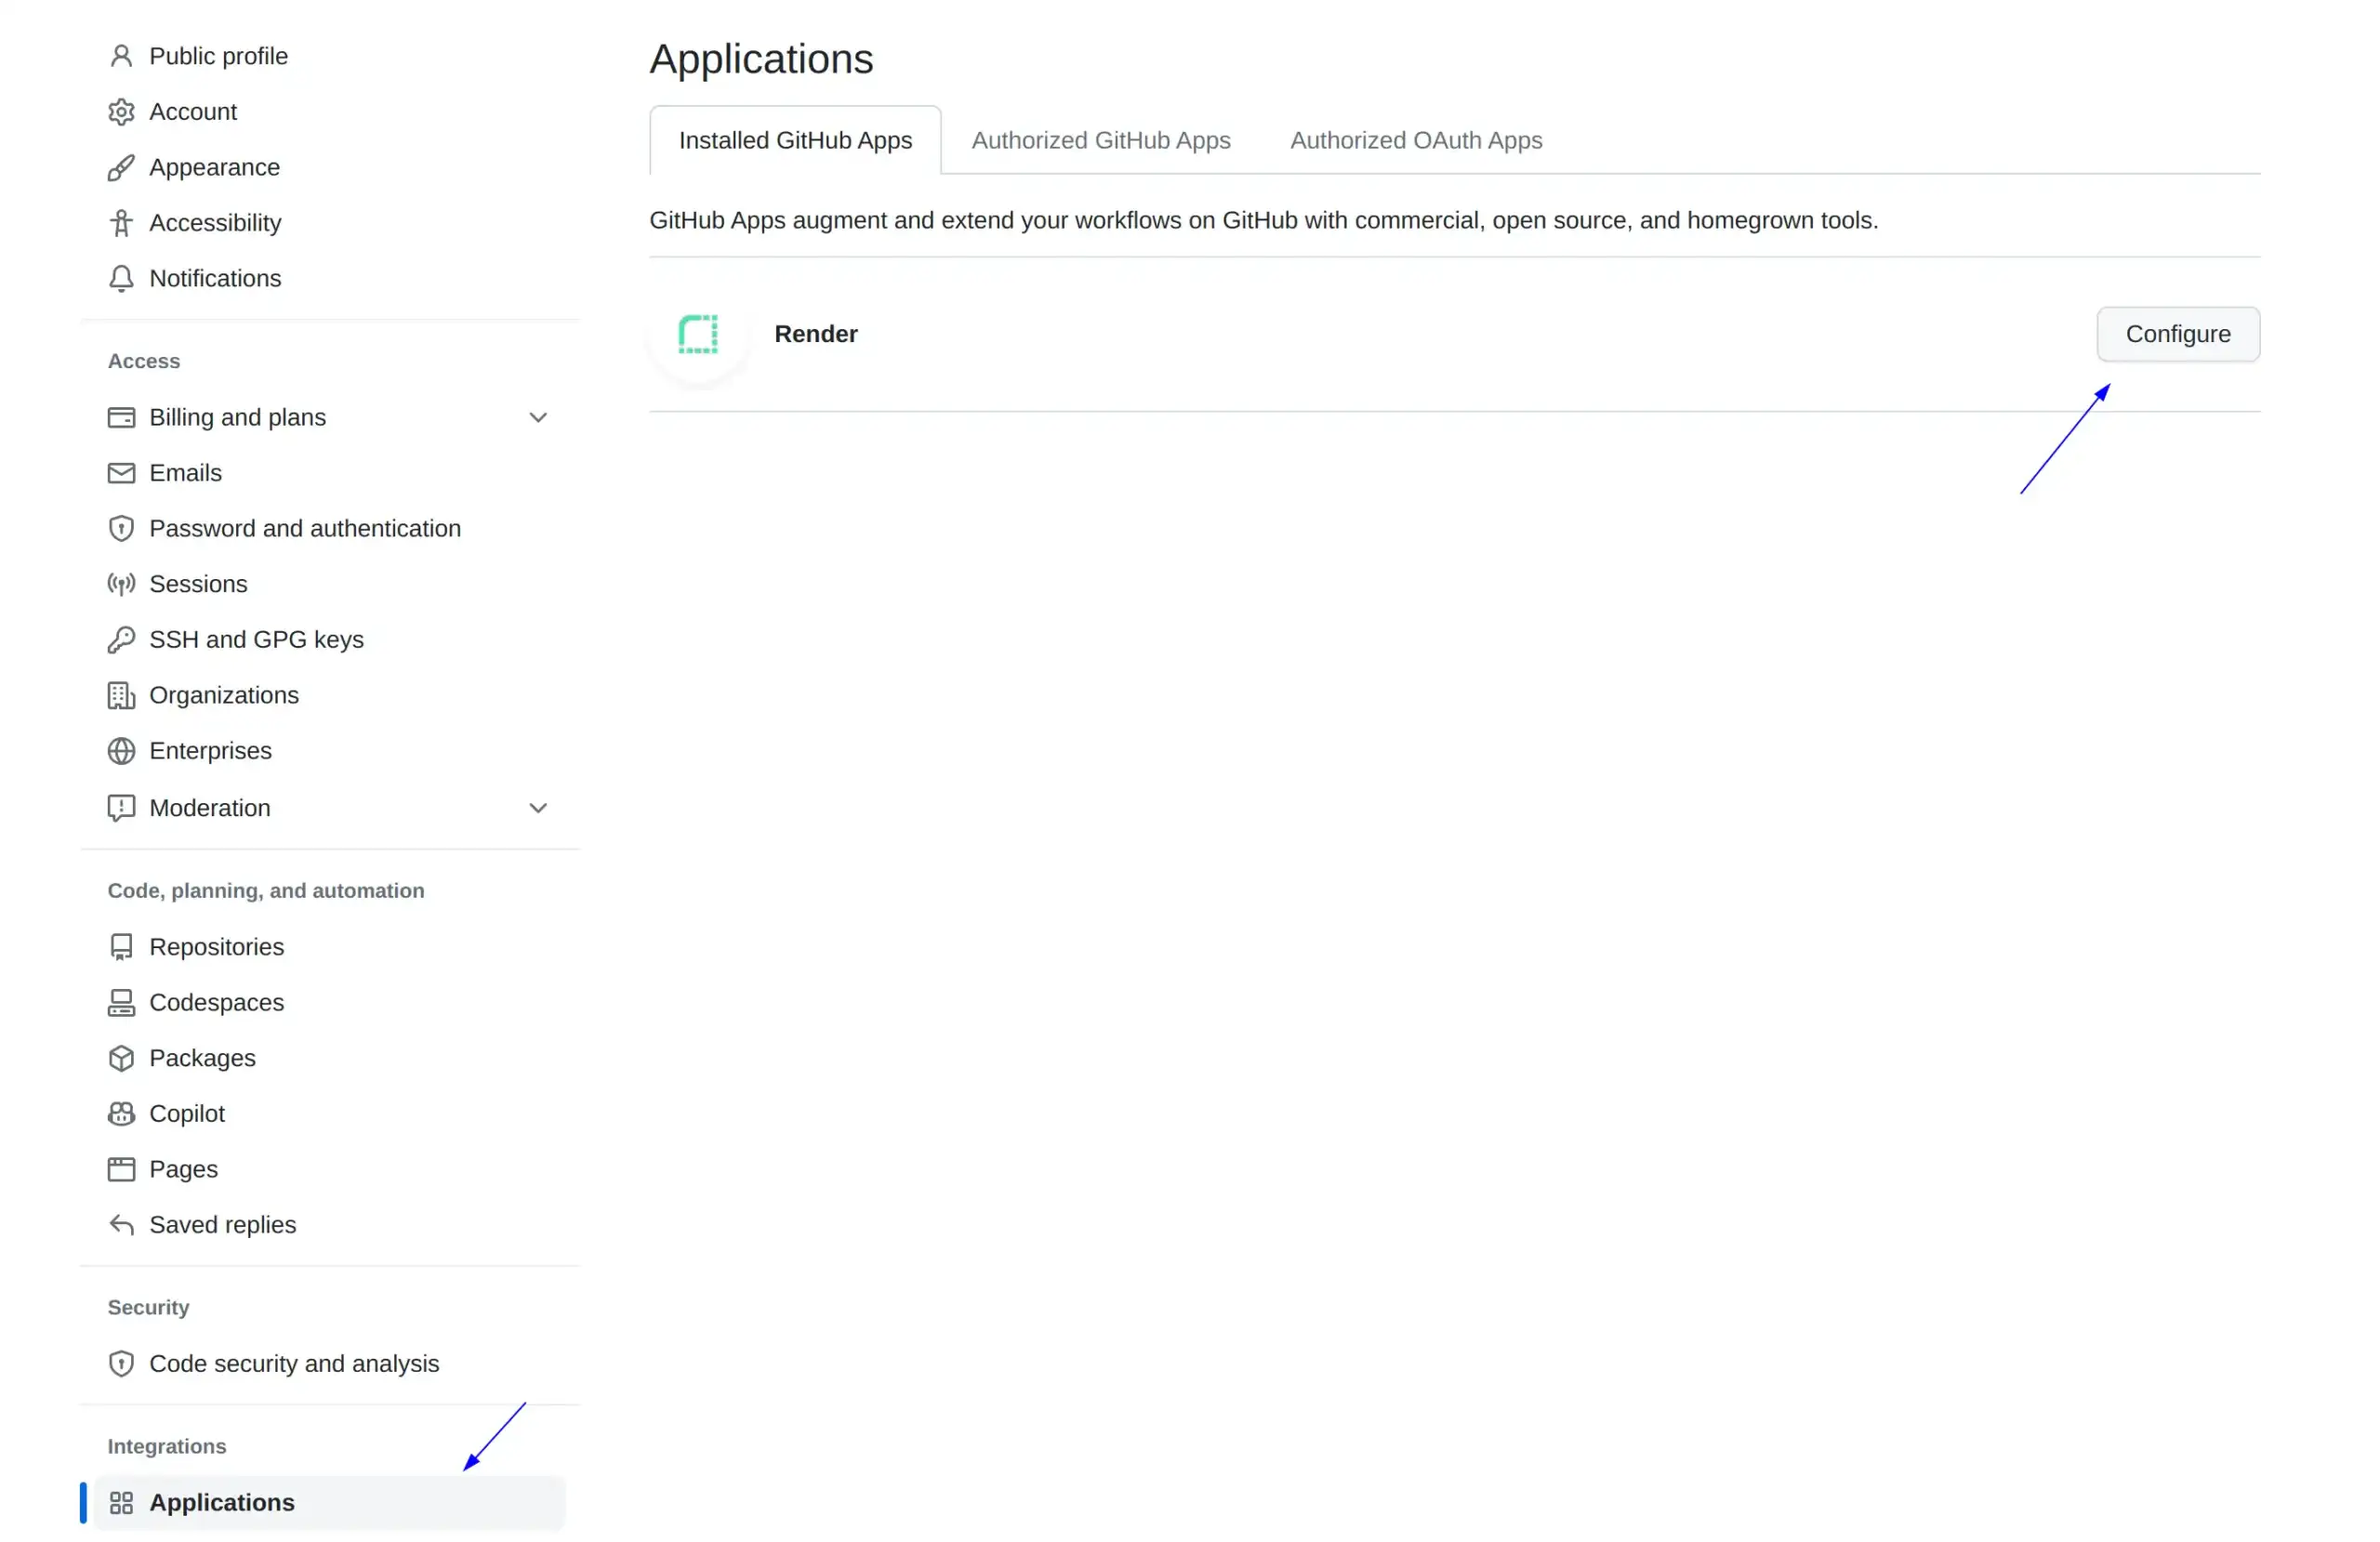
To fix that, you don’t have to disconnect your GitHub account and reconnect it to Render. You need to visit your GitHub account, go to Settings -> Applications, and click Configure in your Render application.
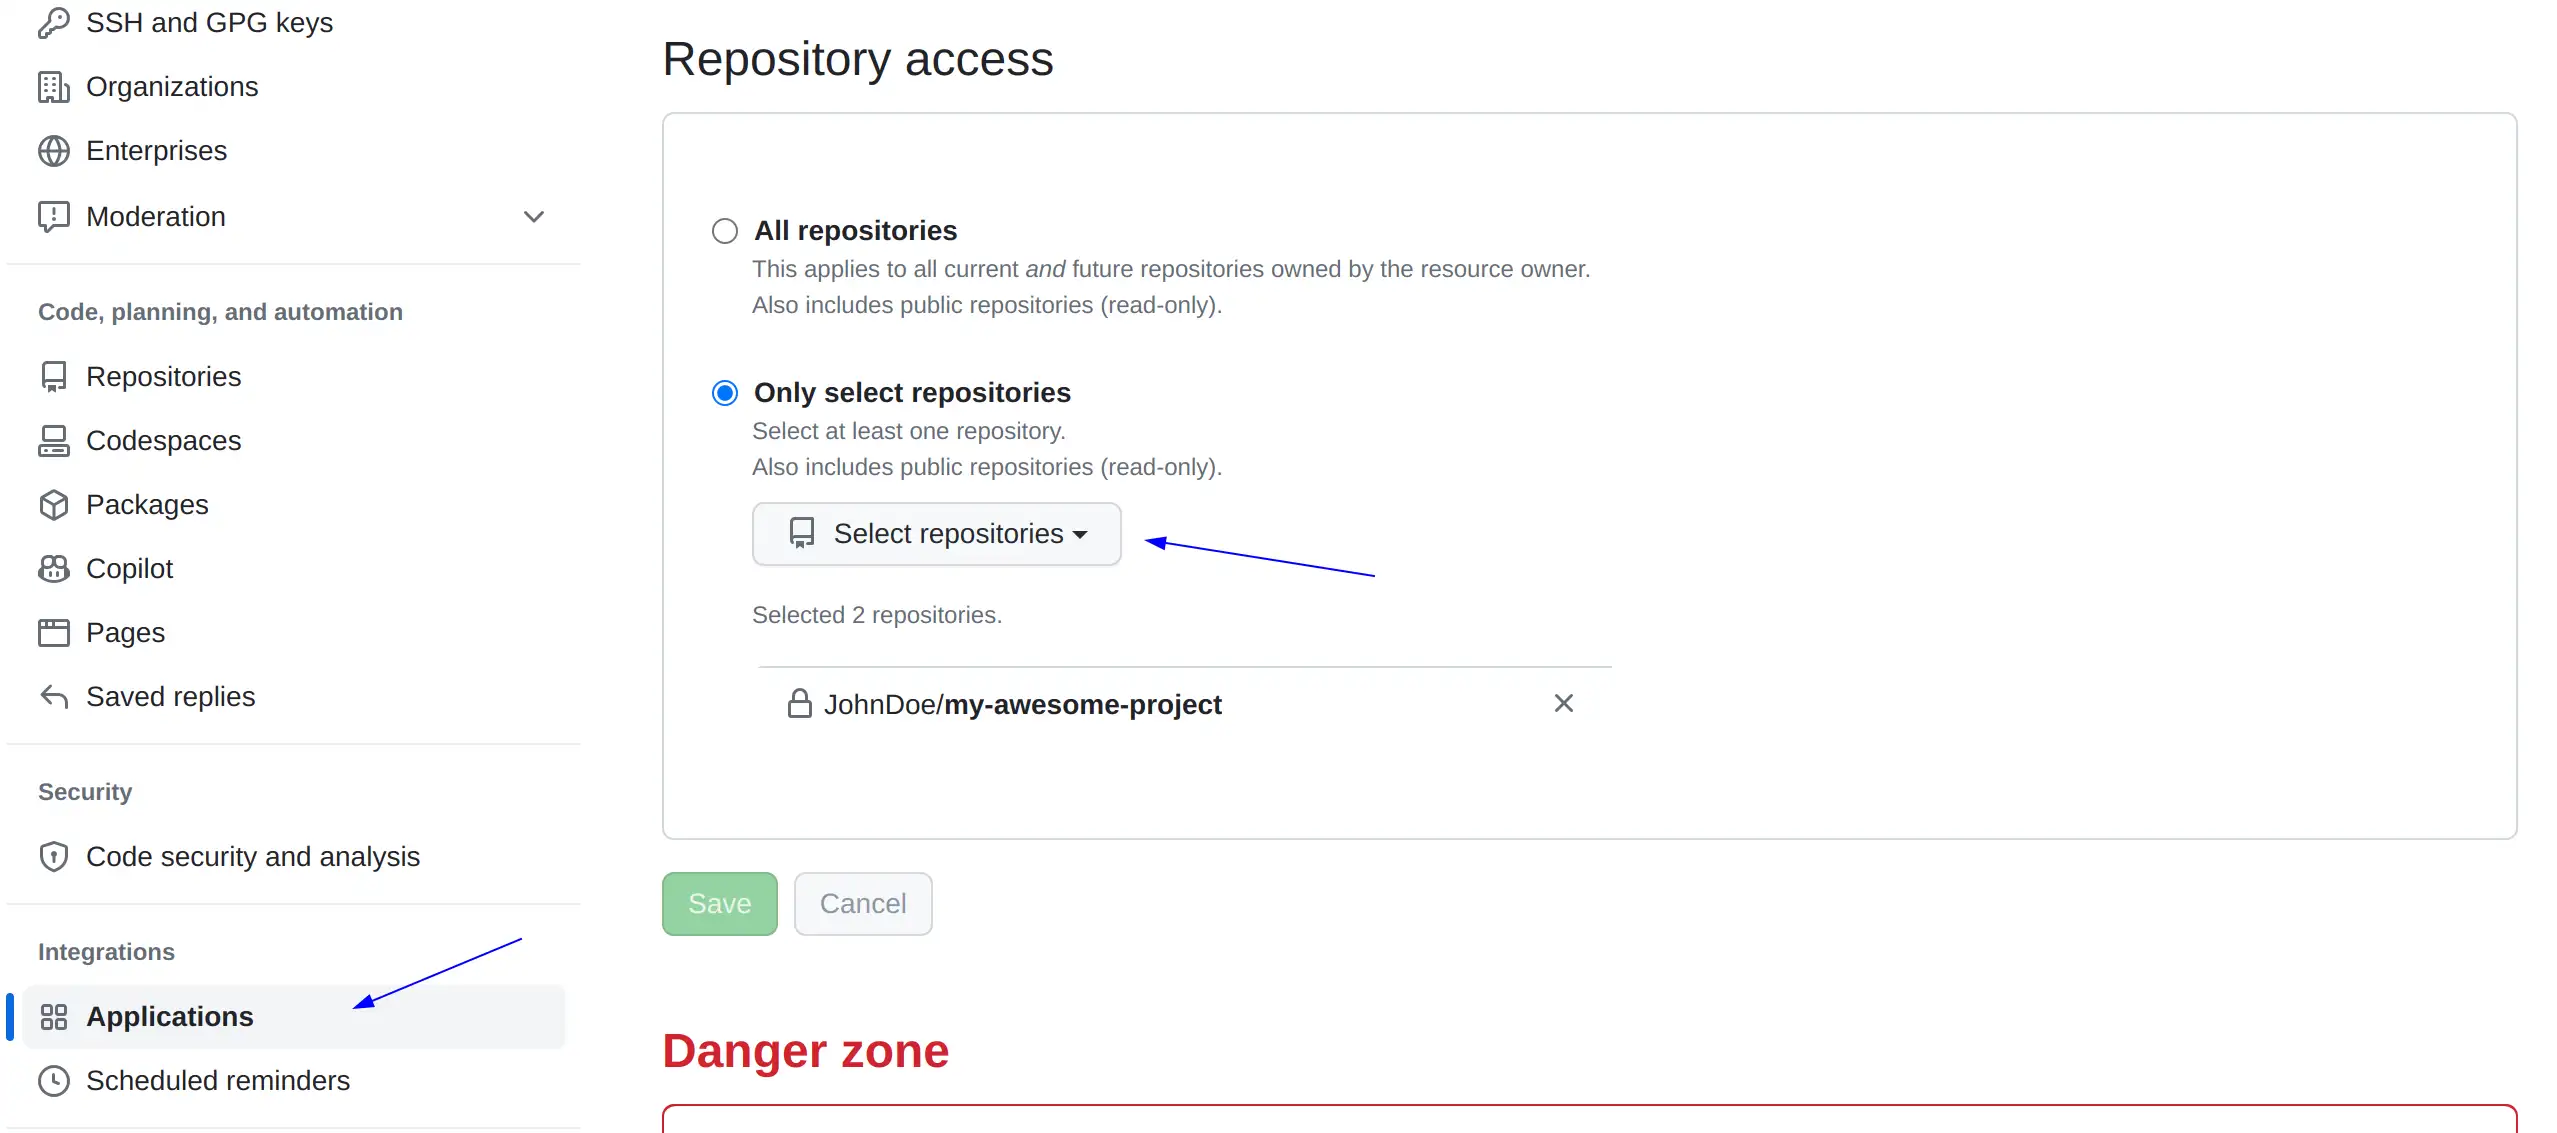
On the middle-bottom of your page, you’ll see the “Only select repositories” option, click on “Select repositories“, select the repository you would like to add for Render.com to use, and click “Save“.
Go back to Render.com and you’ll be able to use this repo now.
My new Next.js app got a deployment fail on Render.com, and if you faced the same issue, you understand my frustration. I mean, why did a new Next.js project failed to deploy? I did nothing exotic, all I did was type npx create-next-app@latest frontend and follow all the basic steps needed to deploy to Render.com.
Why did the deployment fail?
Long story short, you deployed an app and didn’t define the node version your deployment service (Render) will use.
Even though you’ve built your project successfully on your local environment, that doesn’t mean Render.com will be able to do the same, since it might be using different software versions.
Now hang on a minute…you are correct to assume that since you’ve specified all necessary versions through your package.json file you are ready, and Render.com should follow these specifications. However, if you find yourself here, it’s likely because something is still missing or not properly defined. 😇
Okay, what wasn’t defined then? If you are experiencing the exact same issue as I did, your node version wasn’t defined in your package.json file.
Check your local node version by typing
node-v
Bash
My local node version was 18.18.2.
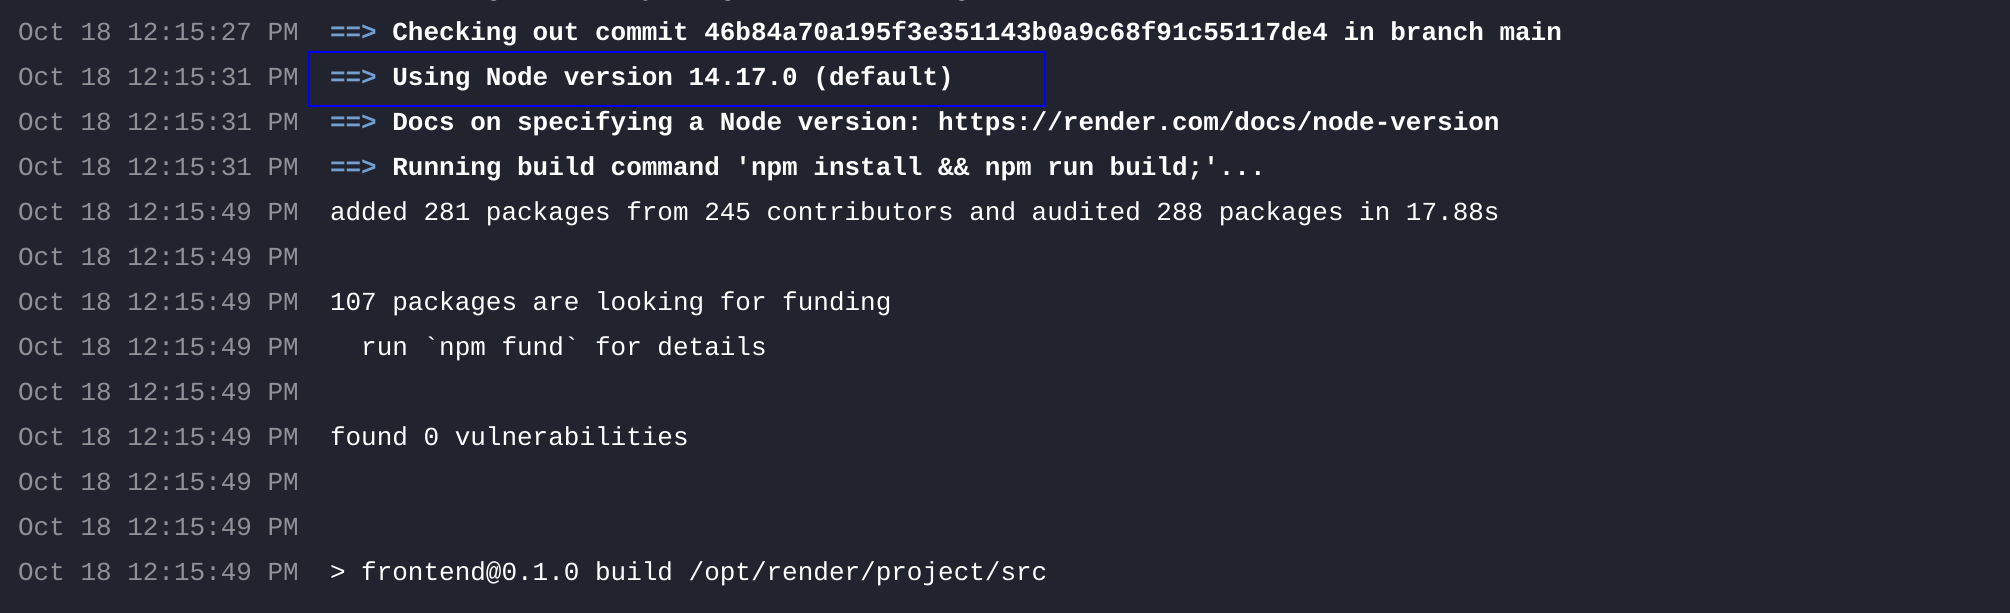
The problem is that Render.com, by default uses (when this post was written) node version 14.17.0. You get where this is going right? We need to ask Render.com to use our version of node so that we have consistency between what’s happening in our local environment and on our live one.
To verify this is the issue with your deployment, you can check your last deployment logs. Somewhere in the beginning you will see Render mentioning the node version it uses:
Deploying successfully
To resolve this problem, we just need to follow a few simple steps. Don’t be afraid; in just a couple of minutes, you’ll be so proud of your deployed app!
The first step is to add in package.json the npm engine property and state our node’s version
Although I haven’t read this elsewhere (so far) since we modified package.json, I like to run npm install to also generate the updated package-lock.json. This way I can include both package files in my commit.
We’ll also need two files inside our source folder
.nvrmc
18.18.2
Plaintext
.node_version
18.18.2
Plaintext
In case you have selected to add an src folder during your Next.js app initialization, you need to add these 2 new files (.nvrmc and .node_version) inside the src folder.
The final step is to include a new environment variable on Render.com. Simply go to the Environment section of your service, and there you can add it by using NODE_VERSION as the key and setting its value to 18.18.2.
We are ready now! Commit and push your applied changes to the remote GitHub repo and a new deployment will be triggered automatically. Voila!
This post describes all the necessary steps to set up an Express.js server using Typescript. We’ll start our project from scratch, create an Express.js server using Vanilla Javascript, and then convert our project to support Typescript. Let’s dive in!
Technology stack used
npm – 10.8.2
node – 20.15.1
express.js – 4.19.2
typescript – 5.5.3
Setting Up the Project with Express.js
In an empty folder of your choice, run the npm initializer with all default options selected by using the following command:
npminit--yes# or npm init -y
Bash
By using the --yes flag we ask npm to set the default answer to any question asked during setup. Remove the --yes flag to see the questions I am referring to.
We will be using a folder called server-project for this post. Running the previous command is the first step of our project, resulting in a package.json file with the following content:
package.json
{"name": "server-project","version": "1.0.0","main": "index.js","scripts": {"test": "echo \"Error: no test specified\" && exit 1" },"keywords": [],"author": "","license": "ISC","description": ""}
JSON
Now that we have initialized our project using npm let’s install Express.js:
Create a new file in your project folder, named index.js, and inside that file, add
index.js
constexpress = require('express');constapp = express();constport = 3004;app.get('/', (req, res) => {res.send('Hello World!');})app.listen(port, () => {console.log(`Example app listening on port ${port}`);});
JavaScript
Excellent! Using node we get to see this baby up and running!
nodeindex.js
Bash
Executing this to your terminal will show you
Exampleapplisteningonport3004
Bash
Opening localhost:3004 to your browser, you will see our server’s response.
In any case, you get some kind of error like listen EADDRINUSE: address already in use :::3004 it means that you are running another application in the port 3004. To fix this, either change in the index.js file, this app’s port, to e.g 3001 or kill the other app you already are running on port 3004.
Installing Typescript
Now that we have successfully installed our Express.js server and we see that everything is working as expected, it’s time to add Typescript.
Kill the node script using Ctrl + C and install Typescript by running
Typescript is stored as a development dependency because it is used only in the development phase of a project for transpiling TS code to Javascript. In production environments, browsers and servers are capable of interpreting and executing JavaScript, not Typescript code.
After installing Typescript to our project we need to initialize it by typing
npxtsc--init
Bash
--init flag is used to initialize a TS project and create a tsconfig.json file with the default options set.
But what about tsc and npx? Where did these come from?
Understanding tsc and npx: Why do we use them?
tsc is the command line tool used by Typescript to compile code (tsc 👉 typescript compiler) into Javascript. It is a part of Typescript package, and it became available to our system when we installed Typescript.
npx on the other side is a package runner tool that came with npm. It was released from npm version 5.2.0. This tool is useful in cases where:
We want to run a package without installing it
We will be executing a package using different versions
To avoid global installation of a package
Ok, sure, but in our case, since we have Typescript installed in our local project folder, and because of this, we also have tsc installed, then why not just use tsc --init? Right? Why do we want to use npx to run tsc?
Just using tsc might use a global version of Typescipt and not the local one
That question killed some of my brain cells 🧠 before figuring it out 😅. Just using tsc --init may use a global version of Typescript installed on your computer. Using npx tsc --init instead will make sure that you are using the local version of tsc package. This way, you will avoid any surprises because of different package versions. 🥳
After successfully executing npx tsc --init you will see a tsconfig.json file created with the following content
tsconfig.json
{"compilerOptions": {/* Visit https://aka.ms/tsconfig to read more about this file *//* Projects */// "incremental": true, /* Save .tsbuildinfo files to allow for incremental ompilation of projects. */// "composite": true, /* Enable constraints that allow a TypeScript project to be used with project references. */// "tsBuildInfoFile": "./.tsbuildinfo", /* Specify the path to .tsbuildinfo incremental compilation file. */// "disableSourceOfProjectReferenceRedirect": true, /* Disable preferring source files instead of declaration files when referencing composite projects. */// "disableSolutionSearching": true, /* Opt a project out of multi-project reference checking when editing. */// "disableReferencedProjectLoad": true, /* Reduce the number of projects loaded automatically by TypeScript. *//* Language and Environment */"target": "es2016", /* Set the JavaScript language version for emitted JavaScript and include compatible library declarations. */// "lib": [], /* Specify a set of bundled library declaration files that describe the target runtime environment. */// "jsx": "preserve", /* Specify what JSX code is generated. */// "experimentalDecorators": true, /* Enable experimental support for legacy experimental decorators. */// "emitDecoratorMetadata": true, /* Emit design-type metadata for decorated declarations in source files. */// "jsxFactory": "", /* Specify the JSX factory function used when targeting React JSX emit, e.g. 'React.createElement' or 'h'. */// "jsxFragmentFactory": "", /* Specify the JSX Fragment reference used for fragments when targeting React JSX emit e.g. 'React.Fragment' or 'Fragment'. */// "jsxImportSource": "", /* Specify module specifier used to import the JSX factory functions when using 'jsx: react-jsx*'. */// "reactNamespace": "", /* Specify the object invoked for 'createElement'. This only applies when targeting 'react' JSX emit. */// "noLib": true, /* Disable including any library files, including the default lib.d.ts. */// "useDefineForClassFields": true, /* Emit ECMAScript-standard-compliant class fields. */// "moduleDetection": "auto", /* Control what method is used to detect module-format JS files. *//* Modules */"module": "commonjs", /* Specify what module code is generated. */// "rootDir": "./", /* Specify the root folder within your source files. */// "moduleResolution": "node10", /* Specify how TypeScript looks up a file from a given module specifier. */// "baseUrl": "./", /* Specify the base directory to resolve non-relative module names. */// "paths": {}, /* Specify a set of entries that re-map imports to additional lookup locations. */// "rootDirs": [], /* Allow multiple folders to be treated as one when resolving modules. */// "typeRoots": [], /* Specify multiple folders that act like './node_modules/@types'. */// "types": [], /* Specify type package names to be included without being referenced in a source file. */// "allowUmdGlobalAccess": true, /* Allow accessing UMD globals from modules. */// "moduleSuffixes": [], /* List of file name suffixes to search when resolving a module. */// "allowImportingTsExtensions": true, /* Allow imports to include TypeScript file extensions. Requires '--moduleResolution bundler' and either '--noEmit' or '--emitDeclarationOnly' to be set. */// "resolvePackageJsonExports": true, /* Use the package.json 'exports' field when resolving package imports. */// "resolvePackageJsonImports": true, /* Use the package.json 'imports' field when resolving imports. */// "customConditions": [], /* Conditions to set in addition to the resolver-specific defaults when resolving imports. */// "resolveJsonModule": true, /* Enable importing .json files. */// "allowArbitraryExtensions": true, /* Enable importing files with any extension, provided a declaration file is present. */// "noResolve": true, /* Disallow 'import's, 'require's or '<reference>'s from expanding the number of files TypeScript should add to a project. *//* JavaScript Support */// "allowJs": true, /* Allow JavaScript files to be a part of your program. Use the 'checkJS' option to get errors from these files. */// "checkJs": true, /* Enable error reporting in type-checked JavaScript files. */// "maxNodeModuleJsDepth": 1, /* Specify the maximum folder depth used for checking JavaScript files from 'node_modules'. Only applicable with 'allowJs'. *//* Emit */// "declaration": true, /* Generate .d.ts files from TypeScript and JavaScript files in your project. */// "declarationMap": true, /* Create sourcemaps for d.ts files. */// "emitDeclarationOnly": true, /* Only output d.ts files and not JavaScript files. */// "sourceMap": true, /* Create source map files for emitted JavaScript files. */// "inlineSourceMap": true, /* Include sourcemap files inside the emitted JavaScript. */// "outFile": "./", /* Specify a file that bundles all outputs into one JavaScript file. If 'declaration' is true, also designates a file that bundles all .d.ts output. */// "outDir": "./", /* Specify an output folder for all emitted files. */// "removeComments": true, /* Disable emitting comments. */// "noEmit": true, /* Disable emitting files from a compilation. */// "importHelpers": true, /* Allow importing helper functions from tslib once per project, instead of including them per-file. */// "downlevelIteration": true, /* Emit more compliant, but verbose and less performant JavaScript for iteration. */// "sourceRoot": "", /* Specify the root path for debuggers to find the reference source code. */// "mapRoot": "", /* Specify the location where debugger should locate map files instead of generated locations. */// "inlineSources": true, /* Include source code in the sourcemaps inside the emitted JavaScript. */// "emitBOM": true, /* Emit a UTF-8 Byte Order Mark (BOM) in the beginning of output files. */// "newLine": "crlf", /* Set the newline character for emitting files. */// "stripInternal": true, /* Disable emitting declarations that have '@internal' in their JSDoc comments. */// "noEmitHelpers": true, /* Disable generating custom helper functions like '__extends' in compiled output. */// "noEmitOnError": true, /* Disable emitting files if any type checking errors are reported. */// "preserveConstEnums": true, /* Disable erasing 'const enum' declarations in generated code. */// "declarationDir": "./", /* Specify the output directory for generated declaration files. *//* Interop Constraints */// "isolatedModules": true, /* Ensure that each file can be safely transpiled without relying on other imports. */// "verbatimModuleSyntax": true, /* Do not transform or elide any imports or exports not marked as type-only, ensuring they are written in the output file's format based on the 'module' setting. */// "isolatedDeclarations": true, /* Require sufficient annotation on exports so other tools can trivially generate declaration files. */// "allowSyntheticDefaultImports": true, /* Allow 'import x from y' when a module doesn't have a default export. */"esModuleInterop": true, /* Emit additional JavaScript to ease support for importing CommonJS modules. This enables 'allowSyntheticDefaultImports' for type compatibility. */// "preserveSymlinks": true, /* Disable resolving symlinks to their realpath. This correlates to the same flag in node. */"forceConsistentCasingInFileNames": true, /* Ensure that casing is correct in imports. *//* Type Checking */"strict": true, /* Enable all strict type-checking options. */// "noImplicitAny": true, /* Enable error reporting for expressions and declarations with an implied 'any' type. */// "strictNullChecks": true, /* When type checking, take into account 'null' and 'undefined'. */// "strictFunctionTypes": true, /* When assigning functions, check to ensure parameters and the return values are subtype-compatible. */// "strictBindCallApply": true, /* Check that the arguments for 'bind', 'call', and 'apply' methods match the original function. */// "strictPropertyInitialization": true, /* Check for class properties that are declared but not set in the constructor. */// "noImplicitThis": true, /* Enable error reporting when 'this' is given the type 'any'. */// "useUnknownInCatchVariables": true, /* Default catch clause variables as 'unknown' instead of 'any'. */// "alwaysStrict": true, /* Ensure 'use strict' is always emitted. */// "noUnusedLocals": true, /* Enable error reporting when local variables aren't read. */// "noUnusedParameters": true, /* Raise an error when a function parameter isn't read. */// "exactOptionalPropertyTypes": true, /* Interpret optional property types as written, rather than adding 'undefined'. */// "noImplicitReturns": true, /* Enable error reporting for codepaths that do not explicitly return in a function. */// "noFallthroughCasesInSwitch": true, /* Enable error reporting for fallthrough cases in switch statements. */// "noUncheckedIndexedAccess": true, /* Add 'undefined' to a type when accessed using an index. */// "noImplicitOverride": true, /* Ensure overriding members in derived classes are marked with an override modifier. */// "noPropertyAccessFromIndexSignature": true, /* Enforces using indexed accessors for keys declared using an indexed type. */// "allowUnusedLabels": true, /* Disable error reporting for unused labels. */// "allowUnreachableCode": true, /* Disable error reporting for unreachable code. *//* Completeness */// "skipDefaultLibCheck": true, /* Skip type checking .d.ts files that are included with TypeScript. */"skipLibCheck": true/* Skip type checking all .d.ts files. */ }}
JSON
Expand
Refactoring JavaScript to TypeScript
Now that we have successfully installed and initialized Typescript we need to start writing some Typescript to have fun.
First of all let’s rename our index.js file to index.ts. If we don’t do that and we run our tsc compiler we will see an error
Make sense right? After all we need at least .ts one file to start our TS journey. Ok now that we have renamed it, lets, out of curiosity, run npx tsc and see what happens. By running this command, I get the following errors
It seems the compiler is unable to successfully convert our .ts file to .js due to three issues. We need to address these issues one at a time. A guide is available that describes each error in detail, including their causes and solutions. Feel free to check it out if you want to learn more.
After dealing with all the necessary problems, the updated .ts file should look something like
Now that we have everything fixed let’s run npx tsc to see if there is anything left. Running this command showed nothing in my terminal. Which is a good sign. To see the compilation results though, I need to make two small tweaks.
Configure TypeScript to create a new folder for all compiled files by using the outDir compiler option.
tsconfig.json
{"compilerOptions": {// ...."outDir": "./dist",// Specify an output folder for all emitted files. }}
JSON
Rename the package.json main file and add a compilation Script
Superb! Now we have everything we need. What’s next? A victory dance! When you run npm start, your terminal will display “Example app listening on port 3004,” which means we did it!
If you are here, it probably means you are not 100% sure whether you should be using the --save flag when running npm install --save. Since this post was written in 2024, the short answer is no, you don’t need to. Let’s see why.
When using, npm install --save (shorthand npm install -S), what you are basically asking npm is to record the packages you are installing as dependencies to your project’s package.json file.
Starting with npm version 5, you no longer need to use the –save flag
Starting with npm version 5, you no longer need to use the --save flag when installing packages. By default, npm automatically saves installed packages as dependencies in your package.json file. This means that whether you include the --save flag or not, the outcome is the same: the dependencies will be recorded in the package.json file.
What about developer dependencies?
For packages that you should handle as developer dependencies – devDependencies -, you should still use --save-dev or -D.
By the way, while writing this post, I got curious about other npm flags since I have mostly been using the two mentioned earlier. As you’d expect, there are more. Here are a few that I found particularly interesting if you want to explore further:
--save-optional
The --save-optional flag saves packages as optionalDependencies. As the name suggests, these are packages that our application may not require. During the installation process, npm will not fail if, for any reason, an optional dependency fails to install.
--save-prod
The --save-prod flag is somewhat confusing at first glance, as it behaves similarly to the --save flag. It explicitly saves any installed package to the dependencies section of the package.json file. This ensures that your application’s production dependencies include the package.
--save-peer
The --save-peer made an impression! This one saves the dependencies into a peerDependencies section. Peer dependencies specify that your package is compatible with a particular version of another package without directly including it as a dependency.
So you just generated a new cool side project and now you are wondering how one changes the default port in a create-react-app project. After all, we have other ports available, right? And there could be a case that 3000 port is already taken. But how can you do that? There are several ways to do that, so let’s check the basic ones.
Using package.json
One way is to go to your package.json file and change your port through your scripts options, in this case, we are adding PORT=3001 to denote that we want our app to run in port 3001
In certain scenarios, you may find it necessary to specify the port directly via the command line when executing your run command. You could do that by typing in your terminal
PORT=3001npmstart
Bash
Keep in mind that if you have a port defined on your package.json and you try adding it inline through the terminal, your package.json port setting will override any port passed through the terminal.
Using .env file
In case you are working on a more complex project or a project that you will be deploying for the world to see your awesome work, you’ll need to set the port to a dynamic value. Why is that? Because the system that will handle your deployment will also be handling the ports.
In this case, you just need to tell your app, where to find the port’s value that will be used, when deployed.
Let’s start by creating a file called .env. Type in your terminal
touch.env
Bash
Now open your .env file and type
.env
PORT=3001
Plaintext
According to the advanced configuration documentation, of Create-React-App, the app’s listening port is determined by reading the value of PORT from the .env file by default.
As a result, our application will utilize the PORT value specified in the .env file to run, so there is no need to make any more changes to our code.
If you’re curious about the order of precedence in case someone adds a port to every possible option, I’ve conducted experiments that reveal the following respected order.
package.json
command line
.env file
Don’t forget to have fun with your new project!! You got this! 😎
In this post, we’ll learn how to embed Codepen projects in WordPress the right way. If you are here, chances are, you have tried to embed a project and got an error about a referer required by Codepen.
I might also be right to assume that you did so by copy-pasting the project’s URL on your website while trying to do so.
Let’s explore a different way to embed Codepen projects without getting this error. The first thing you need to do is visit the project you would like to embed. While on the project’s page check to the bottom right and find a button labelled “Embed”.
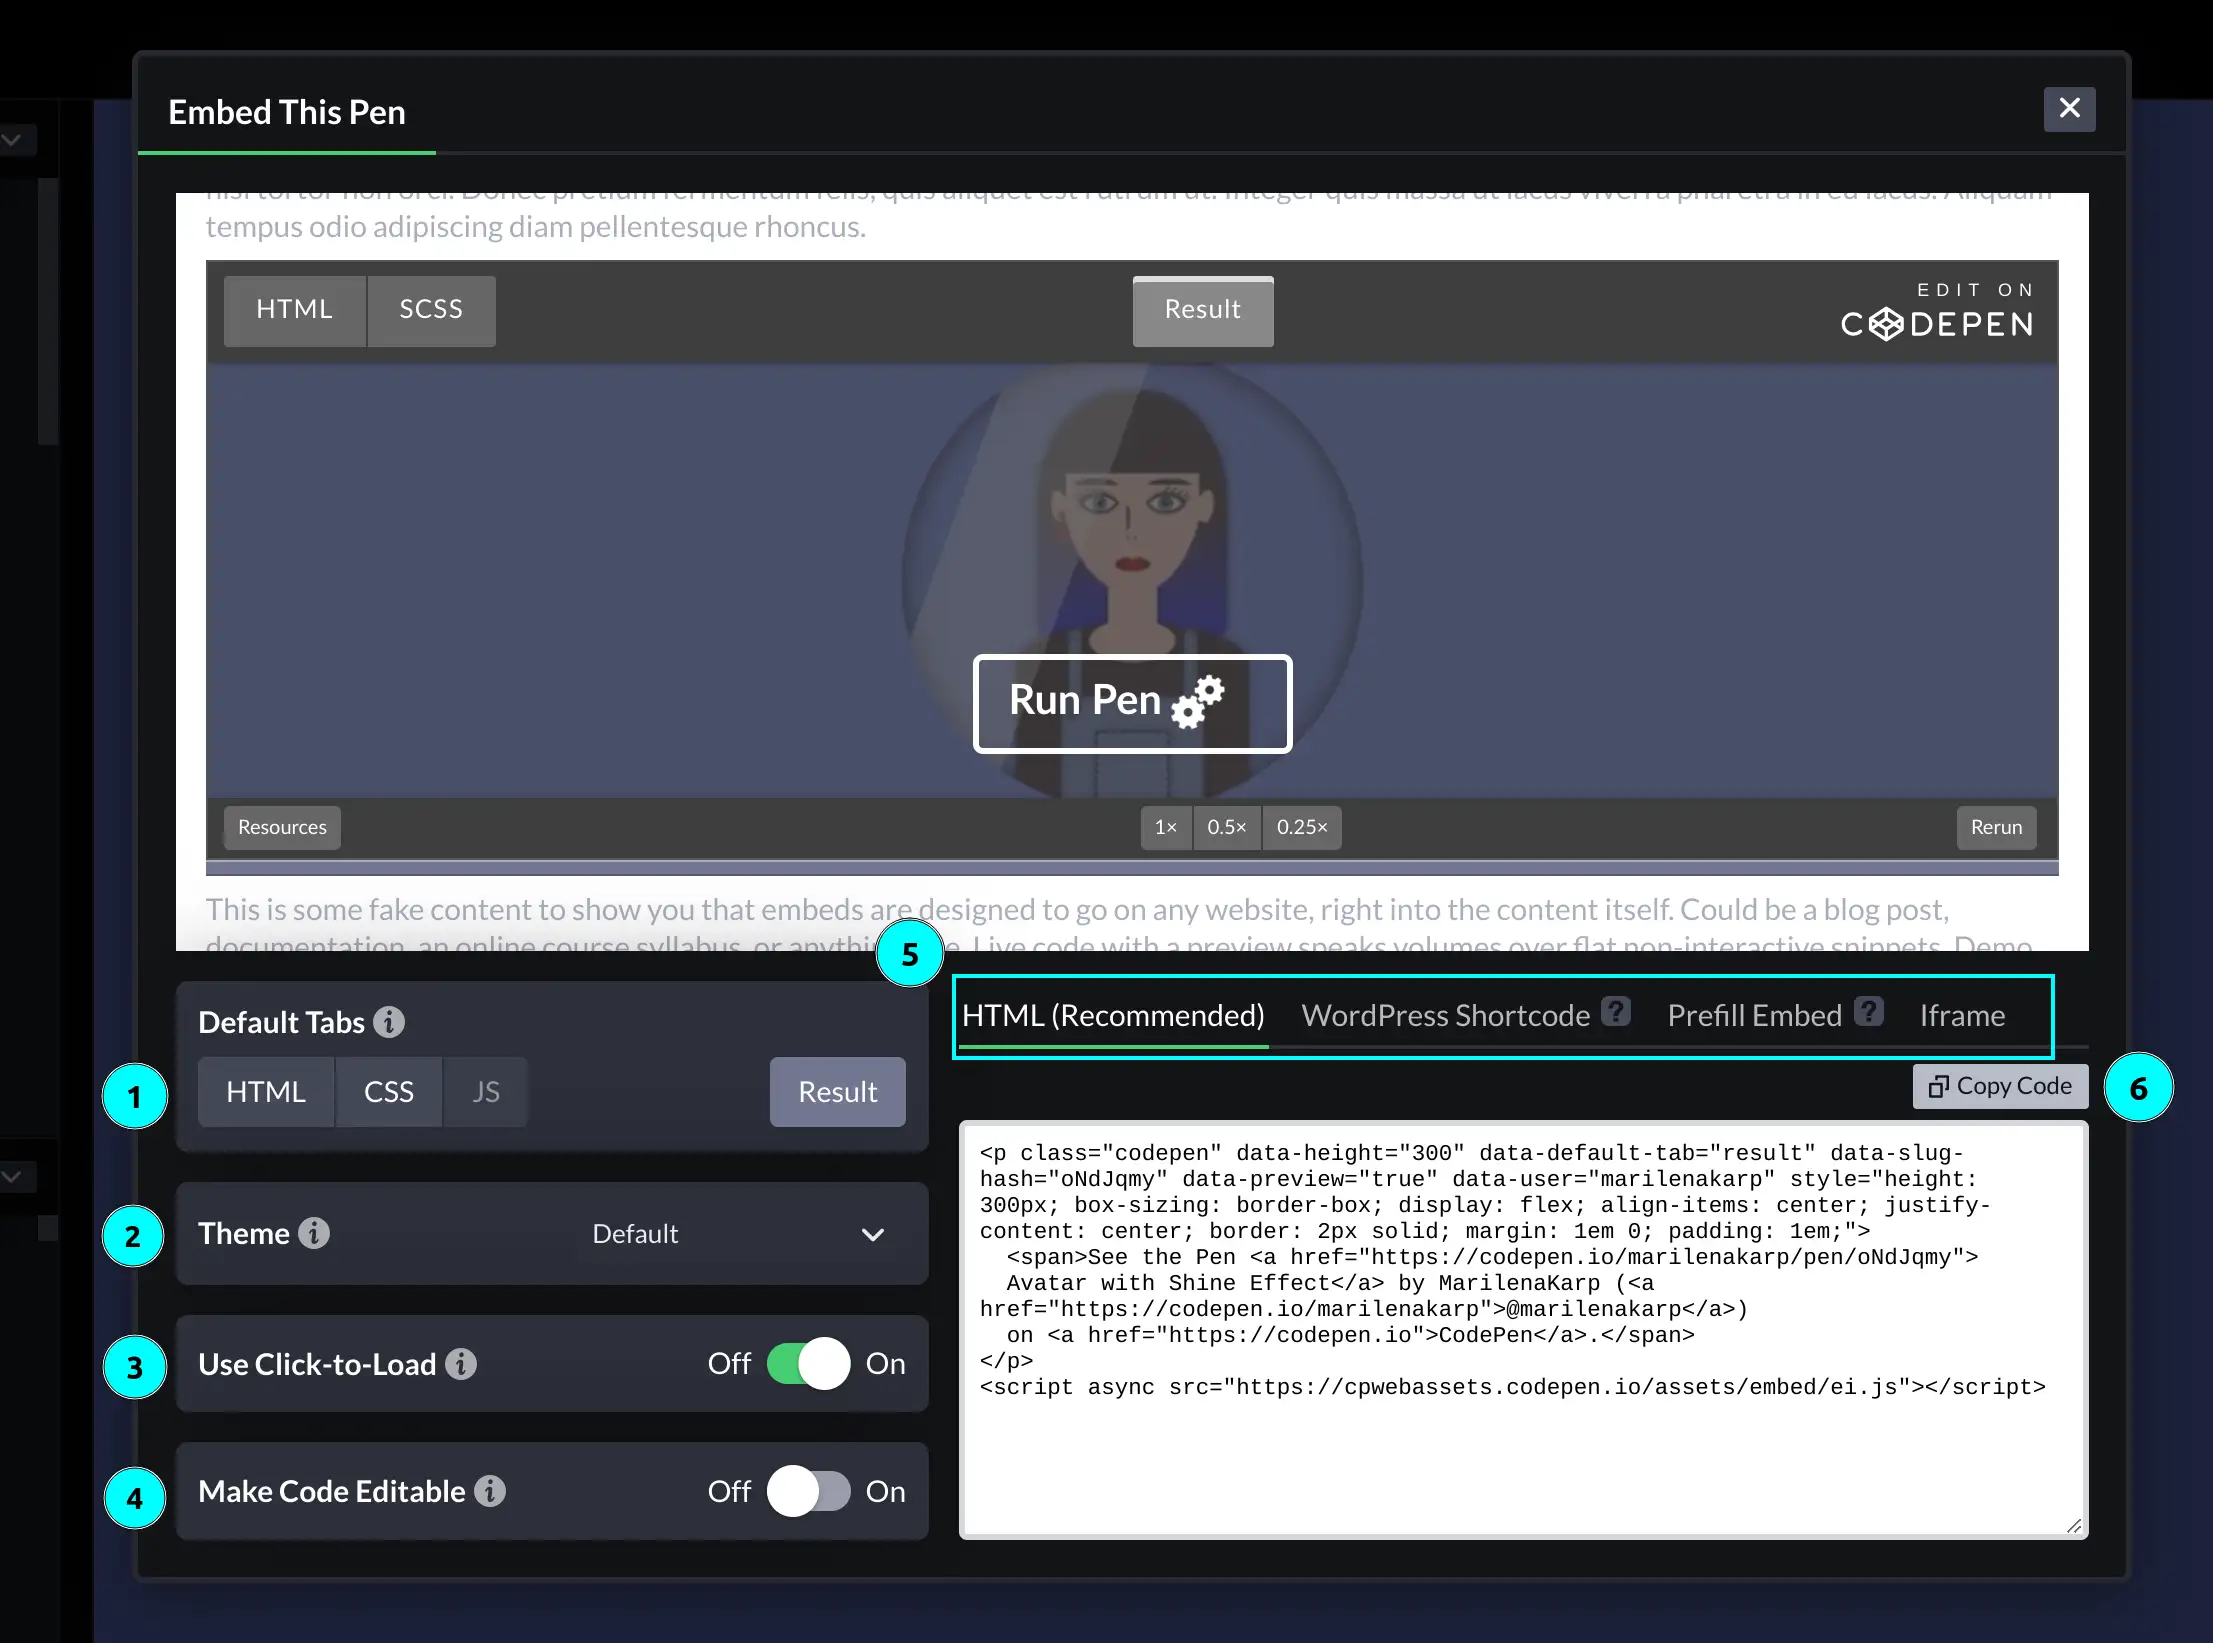
Click on it and you will see a modal popping up with the following options:
(We have added colored light blue numbers in the following image to help you out with each setting)
1️⃣Default tabs – Here, you have the option to choose which tab will be initially displayed as selected.
2️⃣Theme – Select if you would like to show your embedding in a light, dark, or custom theme.
3️⃣Click to load – By enabling this setting your embedding will not load by default, it will rather show a “Run Pen ⚙️” cta at the bottom of your embedding preview.
4️⃣ Code Editable – Enable this setting if you would like to provide your viewers with the ability to edit the embedded pen in real time.
5️⃣Code snippet type – Each tab (HTML, WordPress, etc.) shows a different type of code snippet you need for your embedding. The type you need depends on your WordPress Editor so you’d better check the Embeds Codepen’s guide to be sure what to select.
6️⃣Copy code – Rather than manually selecting the code snippet, simply click this button to copy it. 😋
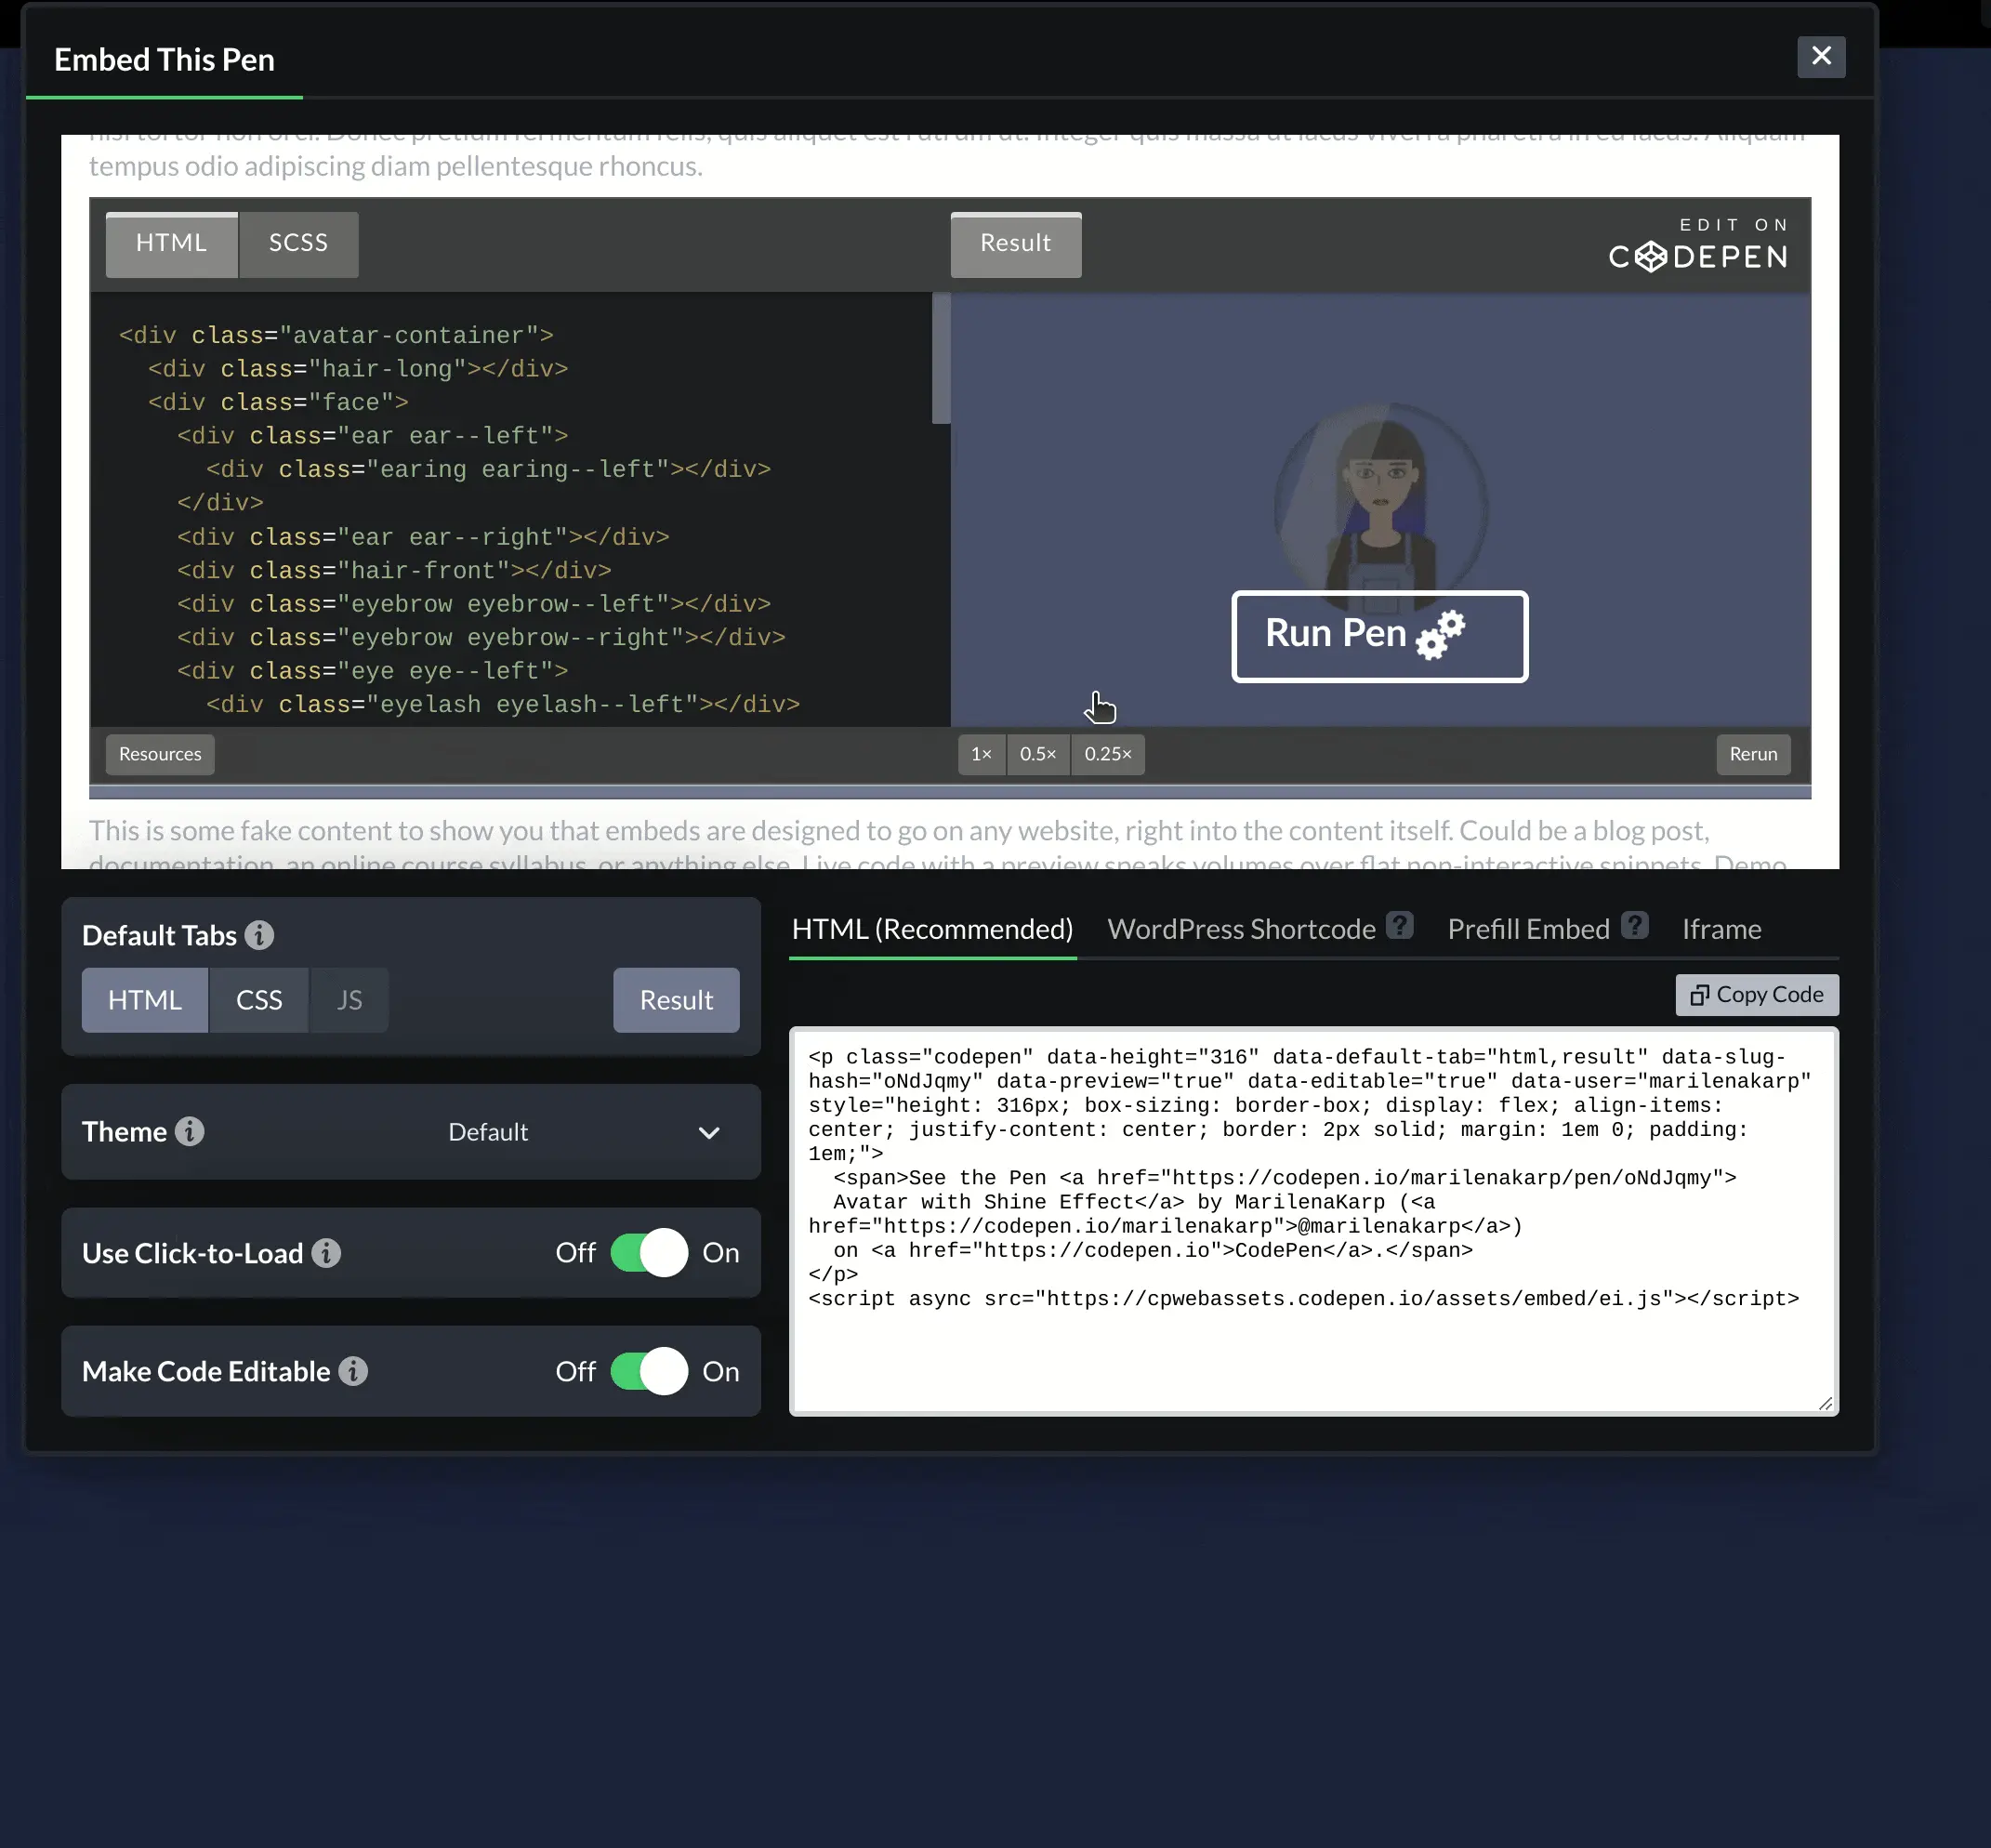
Adjusting height
There is a way to adjust the height of your embedding which is often easily overlooked. While on the embedding settings modal, hover over the bottom border on your preview screen, click on it, and adjust your height according to your needs.
An alternative approach could involve directly modifying the value of the data-height attribute within your code snippet to your desired value.
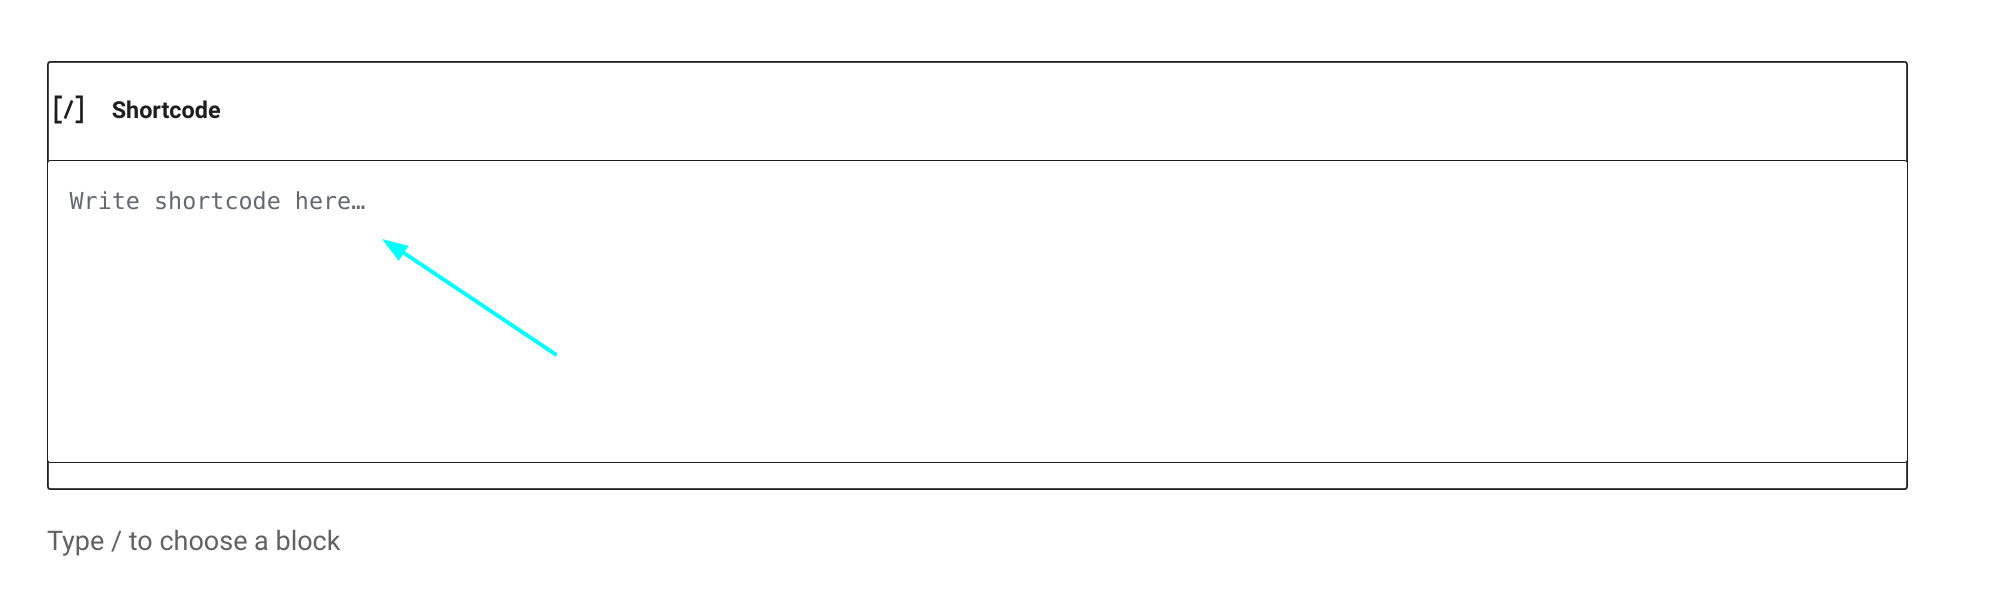
Finally, to embed your pen, go to your WordPress editor, type /shortcode, and press Enter.
Paste the code snippet you copied from Codepen where it says: “Write shortcode here“.
Saving your post and previewing your changes should look something like: