Tag: nth-of-type()

  • CSS Selectors nth-child VS nth-of-type And How To Use Them

    CSS Selectors nth-child VS nth-of-type And How To Use Them

    The amazing CSS selectors family! One of the most helpful tools we can use when styling our website. In today’s post, 😃 we’ll examine the unstoppable battle of nth-child() VS nth-of-type() selectors. They both allow you to target HTML elements based on their position within a parent, but they achieve that differently.

    The moment to clarify the key difference between them and how to use each effectively to get the styling we want has finally come! 🤓

    So, let’s proceed by analyzing and comparing these amazing pseudo-classes! 💻 ✨

    Preparing our HTML structure

    We begin with an HTML code snippet by creating a <section> element as the parent, which contains some <p> and <div> children.

    <section>
      <p>I'm the first paragraph</p>
      <div>I'm the first div</div>
      <p>I'm the second paragraph</p>
      <div>I'm the second div</div>
      <p>I'm the third paragraph</p>
      <div>I'm the third div</div>
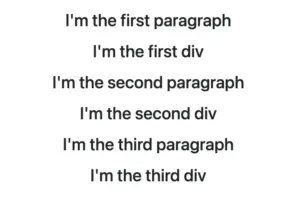
    </section>
    HTML

    Below, we can see what is rendered on the screen for now. Three paragraphs and three div elements. Note that I have kept the default styling: black text on a white background.

    CSS nth child VS nth of type selectors. This image shows <p> and <div> as children inside a <section> element

    The nth-child selector

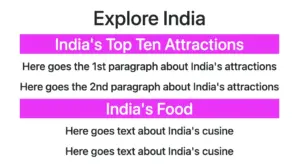
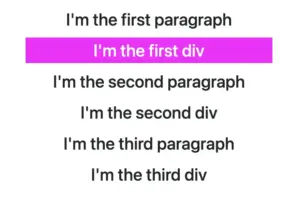
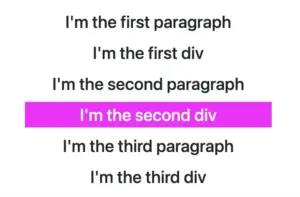
    The :nth-child() selector targets the HTML element declared inside the parentheses, regardless of its type. In the code snippet below, we pick the second child (which happens to be a div) by placing the number 2 inside the parentheses.

    section :nth-child(2) {
      color: white;
      background-color: magenta;
    }
    CSS

    The image below shows that the second child takes on our attributes.

    This image shows <p> and <div> sibling elements, with the second element styled differently using the nth-child(2) CSS selector

    The nth-of-type selector

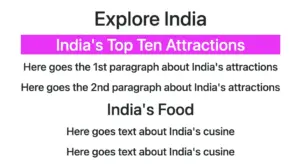
    The :nth-of-type() selector targets HTML elements based on their type. In the following code snippet, we pick the second <p> element by placing the number 2 inside the parentheses () and specifying the type p before the selector.

    section p:nth-of-type(2) {
        color: white;
        background-color: magenta;
    }
    CSS

    The image below shows that the styling is now applied to the second paragraph instead of the second child.

    This image shows sibling <p> and <div> elements. The second <p> element is styled differently using the p:nth-of-type(2) CSS selector, with 2 inside the parentheses and p preceding the selector

    We can also try to do the same with our <div> elements. Let’s change the type, in front of our selector, from p to div. What would happen then?

    section div:nth-of-type(2) {
        color: white;
        background-color: magenta;
    }
    CSS

    We now notice that the styling is removed from the second paragraph and applied to the second div. Cool huh? 😎

    This image shows sibling <p> and <div> elements. The second <div> element is styled differently using the div:nth-of-type(2) CSS selector, with 2 inside the parentheses and div preceding the selector.

    By learning correctly when and how to use each selector, we can ensure that our CSS targets exactly the elements we intend and help us achieve more precise and effective styling. Happy coding! 🎉 👩‍💻

  • The CSS nth-of-type Selector – How To Target Elements By Type

    The CSS nth-of-type Selector – How To Target Elements By Type

    Hello there! Today, we’ll explore how the CSS nth-of-type() selector works. This powerful CSS selector allows us to target every nth child HTML element of a specific type within its parent container.

    Below, I prepared some examples to analyze this amazing pseudo-class thoroughly.

    Basic HTML structure

    We begin with the HTML structure. We create an <article> HTML element. It contains two headings (<h1> , <h2>) elements. Also, we include some <p> and <div> HTML elements. The example may seem slightly complicated, but it is the right way to understand just how useful 🛠 tool this selector can be. 😃
    For now, we’ll maintain the default styling with a white background and black text.

    🔖 Please note that this HTML code snippet will be used across all examples.

    <article>
      <h1>Explore India</h1>
      <h2>India's Top Ten Attractions</h2>
      <p>Here goes the 1st paragraph about India's attractions</p>
      <p>Here goes the 2nd paragraph about India's attractions</p>
      <h2>India's Food</h2>
      <div>Here goes text about India's cusine</div>
      <div>Here goes text about India's cusine</div>
    </article>
    HTML

    Below, we can see what is rendered on the screen 💻 for now. It’s just a simple article in a newspaper 🗞 or on the internet. At least as articles were once upon a time 😂 just text, no images, and no special styling. Don’t worry; it works well for us!

    An article HTML element with <h1>, <h2>, <p>, and <div> elements, all displaying default styling, illustrating the CSS nth-of-type() selector in action.

    Targeting a specific HTML element

    Now let’s explore how this selector works. We start by using the nth-of-type() selector, preceded by h2, and placing the number 1 inside the parentheses (). This targets the very first <h2> element within our <article> parent.

    article h2:nth-of-type(1) {
      color: white;
      background-color: magenta;
    }
    CSS

    In the following image, we can see the result of the applied nth-of-type selector.

    An article HTML element containing <h1>, <h2>, <p>, and <div> elements. All have default styling, except the first <h2> element, which has a magenta background and white text, styled using the h2:nth-of-type(1) CSS selector.

    Targeting all elements of a specific type

    We continue and dive a bit deeper! We place h2 before our nth-of-type() selector, but this time, we add the n inside the parentheses (). By doing so, we target all <h2> elements within our parent element.

    The n in nth-of-type(n) enables the selector to match elements at any position among siblings. This means you can apply styles to all matching elements without specifying an exact position, ensuring that every instance is included.. 😎

    article h2:nth-of-type(n) {
      color: white;
      background-color: magenta;
    }
    CSS

    In the image below, we notice the styling applied to all <h2> HTML elements after using the nth-last-of-type(n) selector.

    An article HTML element containing <h1>, <h2>, <p>, and <div> elements. All have default styling except the <h2> elements, which have a magenta background and white text, styled using the h2:nth-of-type(n) CSS selector.

    Targeting elements of various types

    Additionally, we have the option to use the nth-of-type() selector to target more than one different type of HTML elements. In our case, we set the p:nth-of-type(1) to target the first <p> element and also the div:nth-of-type(2) to target the second <div> element.

    article p:nth-of-type(1),
    article div:nth-of-type(2) {
    	 color: white;
    	 background-color: magenta;
    }
    CSS

    This is how it currently looks on the screen 💻. Cool huh? 😃 ✨

    An article HTML element containing <h1>, <h2>, <p>, and <div> elements. All have default styling except the first <p> and the second <div> elements, which have a magenta background and white text, styled using the p:nth-of-type(1) and div:nth-of-type(2) CSS selectors.